
In this complete walkthrough for Artifact Seekers: Witch Wood chapter you’ll find all the steps and answers you need to finish it.
Look beyond the dark fairy tale and help those poisoned by its magic.
Fairy tales were always darker than we learned them as children, but that doesn’t mean you can’t find a happy end for this story if you follow my lead. Let me help you with all the puzzle and mini-games as we experience this adventure together.
Witch Wood Walkthrough
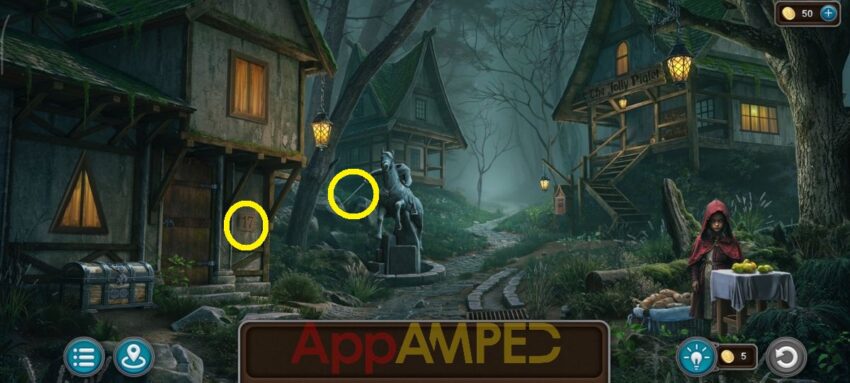
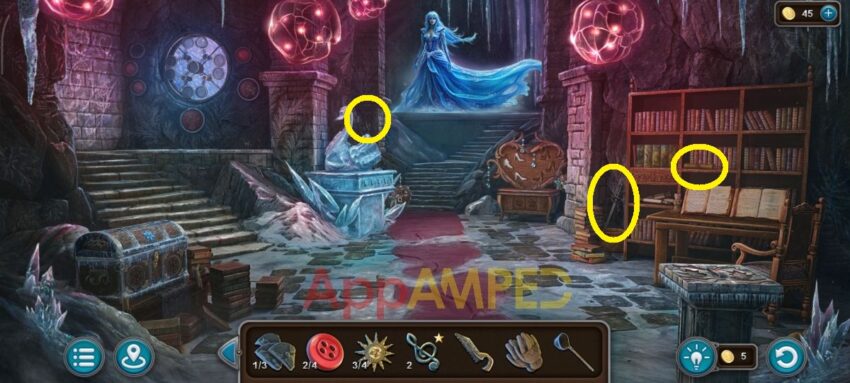
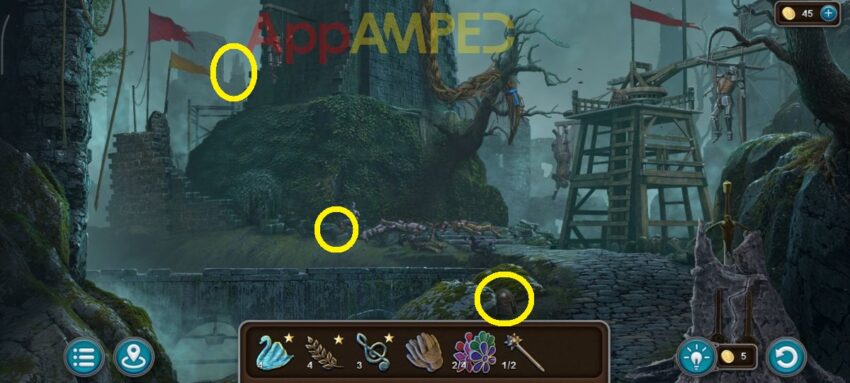
Note for collectibles: There’s a morphing object here that I’ve circled for you and a sword collectible. The boot is at the top of the stairs to the tavern, in the man’s foot. Next to the chest on the left there’s a wheat* in the grass on the left.
Look at the table where the little girl is and take the note (1/2). Now you can enter the house on your left to explore for more clues, you’ll find Red Ridding Hood’s dad.
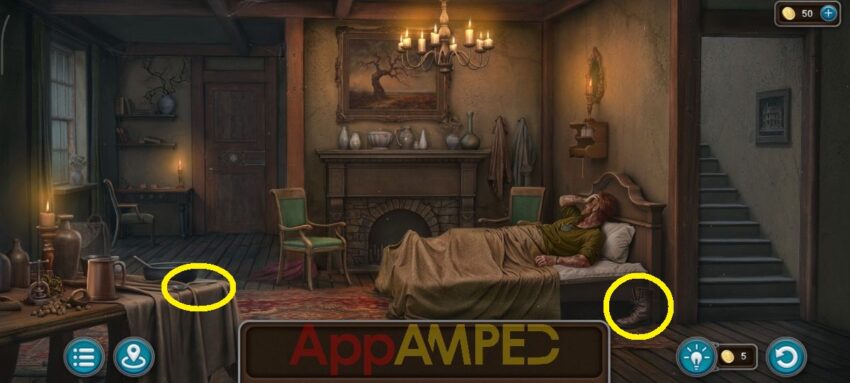
Note for collectibles: There’s a morphing object here that I’ve circled for you and a boot collectible. There’s also a swan* under the painting with the tree.
Go to the fireplace, use the poker on the side to look through the coals and get the fire symbol (1/2). Now go up the stairs to explore the child’s bedroom. Take the ball of thread on the floor next to the bed.
Look at the toy house and take the toy soldier and go back outside. Next go up the stairs at the tavern, talk to the bartender and then go back outside to find some coins.
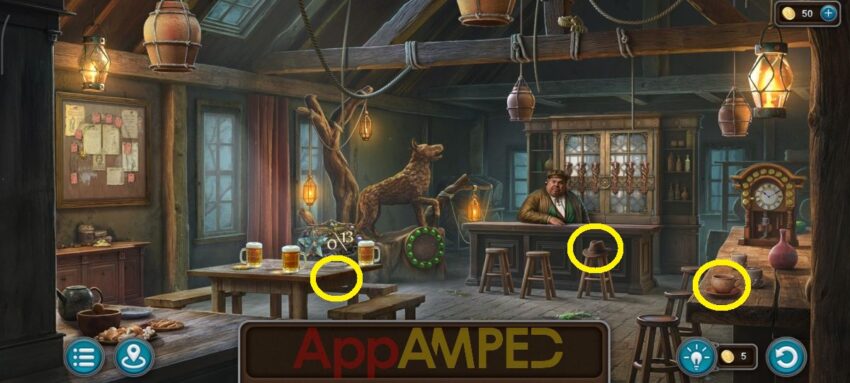
Note for collectibles: There’s a morphing object here that I’ve circled for you and a sword drawn on the table with the beers. There’s a treble chef* in the bartender’s chest pocket and a treble chef* on the chair under the hat.
Take the path leading to the trees and explore the surroundings and the forest.
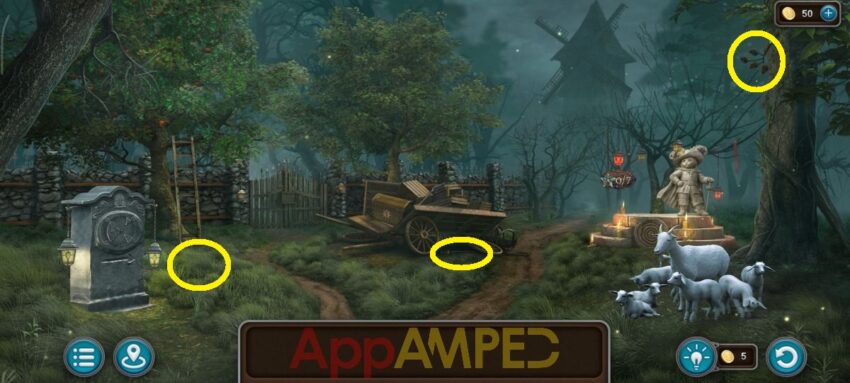
Note for collectibles: There’s a morphing object here that I’ve circled for you and a sword under the cart. Behind the stone sign, in the weed stack there’s a wheat ear*.
Take the pitchfork from the broken cart, then move along the path even further into the forest to reach the mill.
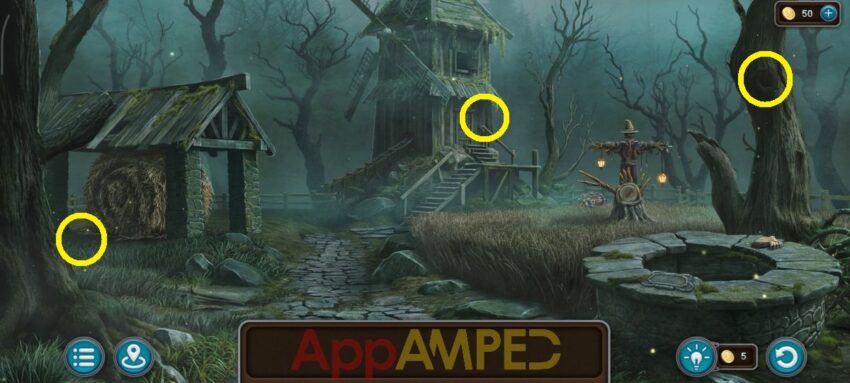
Note for collectibles: There’s a morphing object here that I’ve circled for you and a boot at the scare crow’s waist swan* in the hay next to the haystack. Another swan* is in the hay inside the mill.
Take the bird (1/4) from the well and read the message. Go to the haystack and use the pitchfork to get some hay. You’ll also find a needle and can go back to the goats and give them the hay.
You’ll find slab pieces (1/3) on the ground and a mill relief (1/2). Now go back to the house and up the stairs to the bedroom. Put the needle in the needle cushion in front of the doll house and solve the puzzle.
Light up the lights in the correct windows, you have already seen the hint earlier in the game. The lights around the townhouse will show you the way.
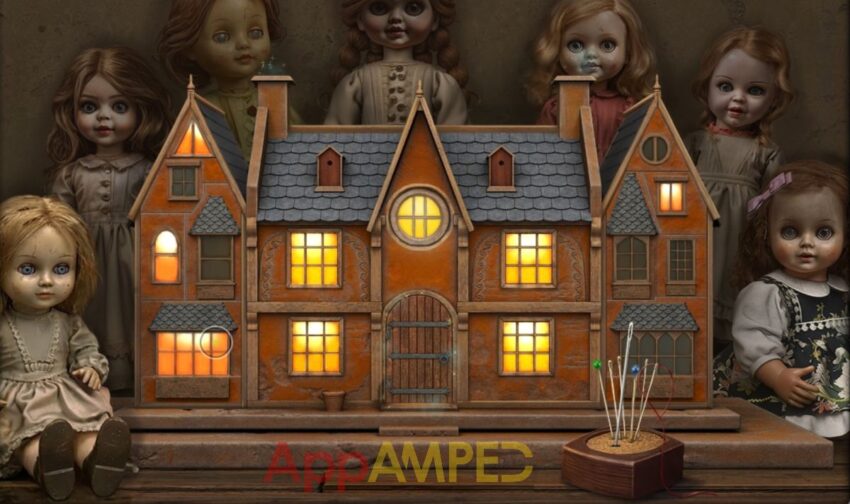
Take the crescent moon (1/3) and mill relief (2/2). Go back to the mill and use the two mill reliefs to open the door after you solve the puzzle.
Move the colored blocks onto the stones of the corresponding color.
Inside you’ll find on the floor a crescent moon (2/3) and a scythe figurine. Give the cat the ball of thread to look at the box under her. Take the coin from the bag and go outside to the well.
Throw the coin in the well and you’ll be given 3 coins back and a request for water. Go back to the broken cart and use the scythe to unlock the chest, take the candy button (1/4).
Go back to the tavern and give the coins to the bartender to get the information you need to reach the dark forest. Look behind him at the cupboard and solve the puzzle:
- 4th head – 1st – 6th
You’ll find an envelope and can go explore the tavern. Look at the notice board on the left and you’ll find a sun (1/4) behind one of the notes. Another sun (2/4) is on the table next to the other beers.
Look at the wooden beams on top of the bar and use the pitchfork to get the bird (2/4). Check out the clock on the right and put the toy soldier here then solve the puzzle.
Leave only the necessary medallions open. You have already seen the hint on the notice board, the red notes pinned there.
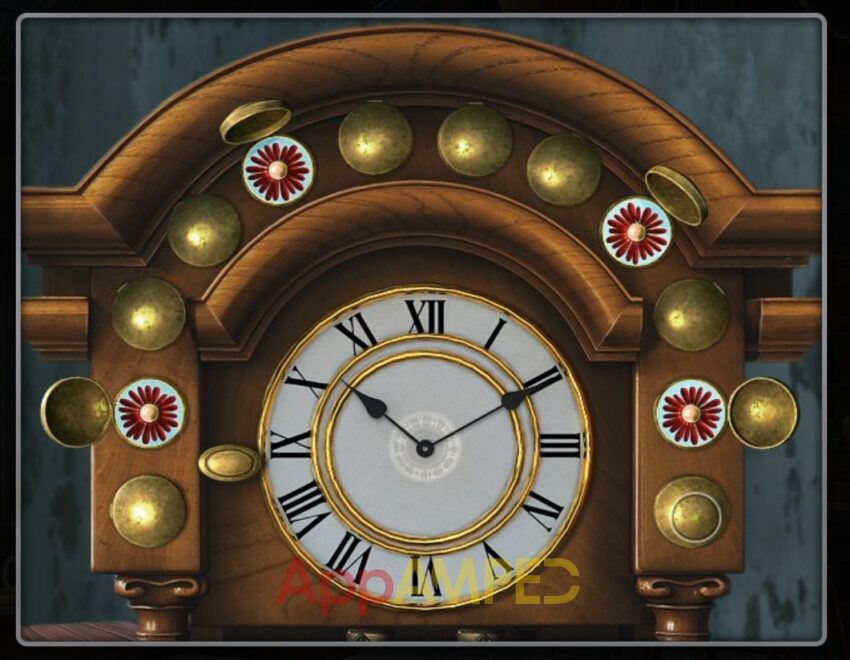
Take the hammer figurine and go outside. Use the envelope on the mail box in front of the tavern to find a sun (3/4). Go inside the mill and use the hammer on the box.
Inside you’ll find a saw and some wire. Go to the town center and use the wire at the sewer grates on the ground to get the signet ring. Go give it to the bartender and get the tree figurine.
Go to the gates in the forest and use the tree to open them after you solve the mini-game. Rearrange the planks so that no gaps remain when they are overlaid. Click on the tree to overlap them.
Solving it will give you a star if you do it in under 7 moves. I only needed 1 move and the gate was open to go into the dark forest.
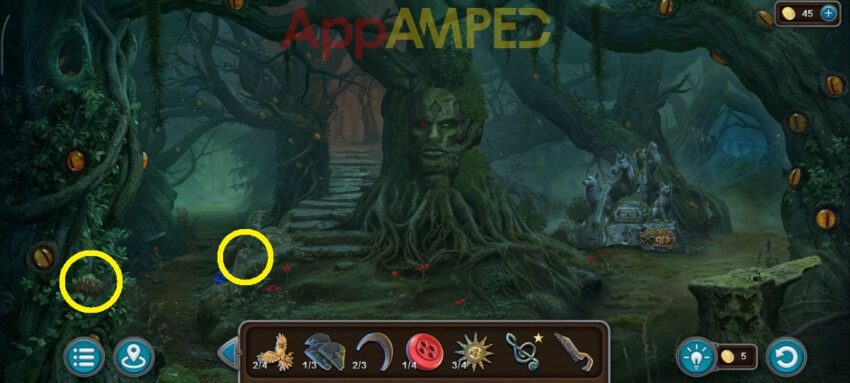
Note for collectibles: There’s a morphing object here that I’ve circled for you and a boot if you look closer at the animal statue in the cat’s paw. There’s a wheat* you can find next to the blue flower.
Look inside the tree hollow on the left to find another bird (3/4). Take the right path and forward again till you reach the sign post. Then take the bucket and go back to the tree face at the beginning. Walk up the stairs to reach the gingerbread house.

Note for collectibles: There’s a morphing object here that I’ve circled for you and a sword. At the window next to the door there’s a swan*.
You’ll find the last moon (3/3) on the sign to your left. You can go back and take the left path to reach the swamp.
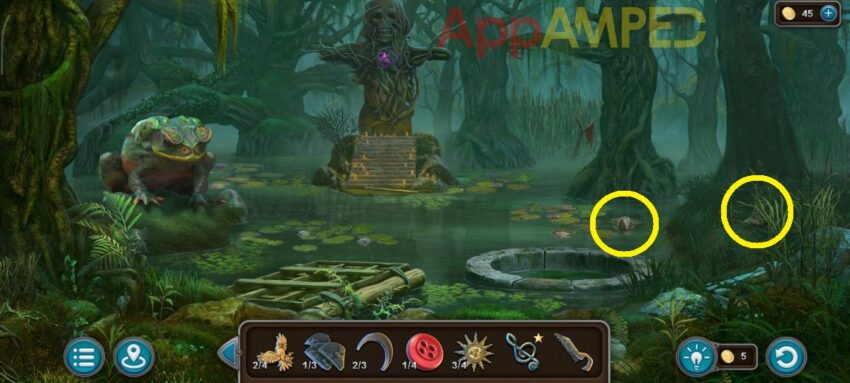
Note for collectibles: There’s a morphing object here that I’ve circled for you and a boot. After the toad leaves later in the game, you’ll find a wheat* under a water lily.
Nothing to do here for now so you can go back to the house, get inside, go to the desk in the back and put the crescent moons to open the drawer and take the whistle and the iron flower.
Use the iron flower on the door next to the desk. Click the arrows to move the wolves into their correct positions.
Take the oar and the gloves, then go to the swamp. Use the oar with the wooden raft on the water to reach the stick with the red cloth and get a bell from the bushes.
Go to the gingerbread house and use the whistle to make the dog go away. Go to the flower bed and take the cauldron figurine on the little fence. Look at the door and put the bell here.
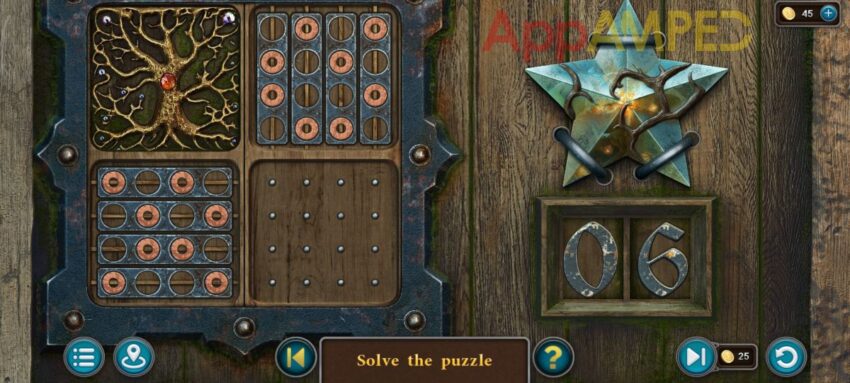
Highlight the cells with symbols. The patterns bellow show which cells should be selected. Empty cells must not remain highlighted.
Count the tiles under from 1 to 15th, I’ll show you what tiles you need for each pattern to be able to enter the gingerbread house and talk to Lady Caramelissa:
- 1st: 1 + 4 + 9
- 2nd: 2 + 3 +12
- 3rd: 3 + 4 + 14
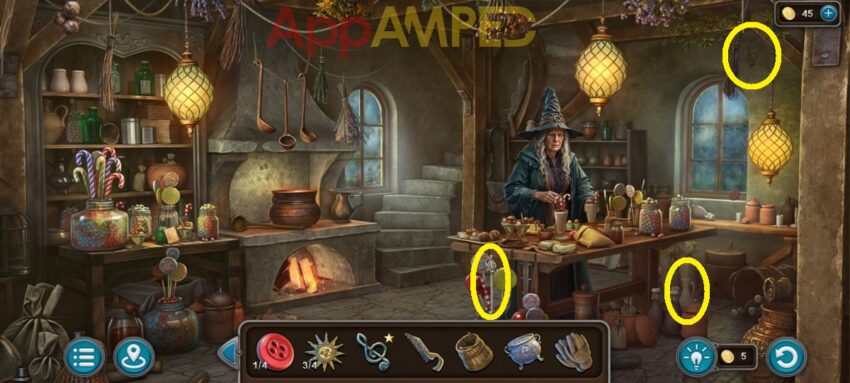
Note for collectibles: There’s a morphing object here that I’ve circled for you and a sword. There’s a treble clef* on the wall.
Go to the sick man and get the pendant then come and give it to Lady Caramelissa. Look on the table to the right, read the recipe for Water of Life, take the moon dew and candy button (2/4).
Look at the window on the right, take the fire symbol (2/2). Go up the stairs and use the cauldron emblem on the lock of the storage room. Click the arrows on the central mechanism to move the chips and match the animal images.
Inside the storage room you’ll find a net and get a jar of marmelade crystals from the shelf. Put the moon dew in the jar after you open it, go outside and use the net to catch some fireflies from the glowing lamp.
Go to the swam with it and pour the solvent in the water at the well. Grab the bucket and fill it with water of life and take it to the other well at the mill and pour it there. You can now go down the stairs into the well and talk to Helga.
Note for collectibles: There’s a morphing object here that I’ve circled for you and a sword. There’s a treble clef* behind the swan under the grey brick.
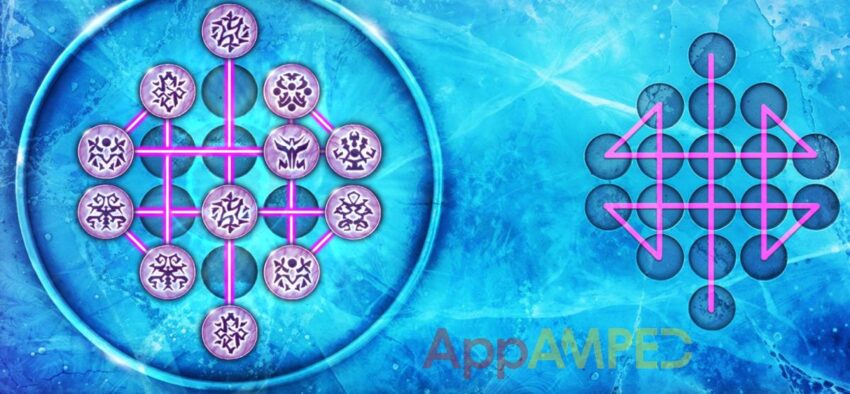
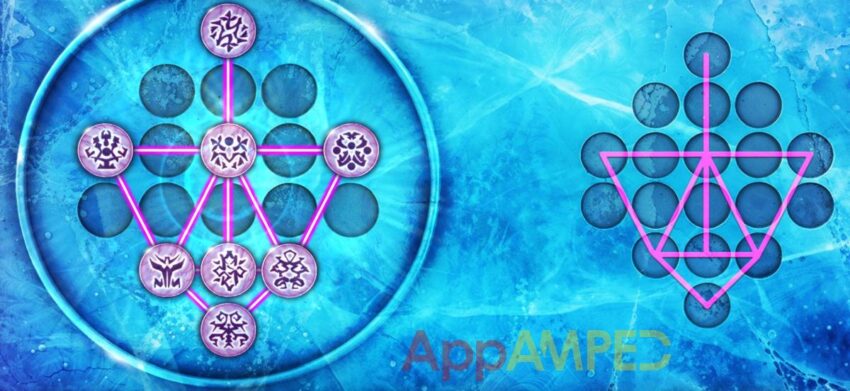
Look at the stone table on the right and put the 2 fire emblems here. Place all the magma blocks in the empty spaces between the ice blocks.
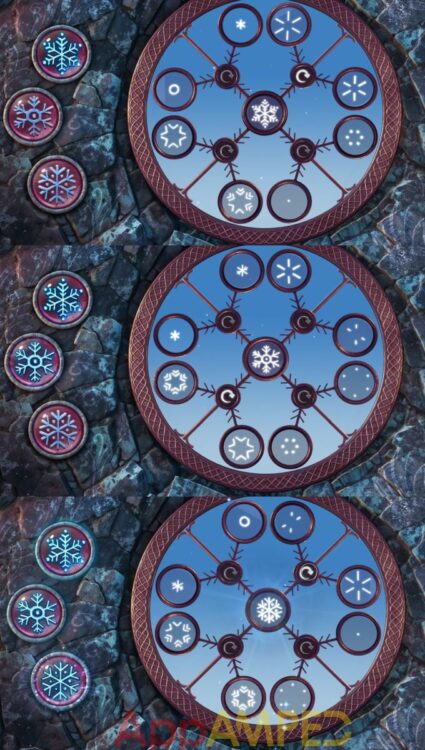
You’ll find a half-sphere and a head. Put the half-sphere on the round window in the back and solve the snowflake puzzle. Rotate the lenses and assemble the snowflakes as shown in the clues. Do it within the 99 seconds to get a star.
It will give you a last bird (4/4). Go to the dark forest, where the head in the tree is and put all 4 birds on the tree trunk to your right. Take the slab piece (2/3) the crow brings.
Go to the swamp and give the fireflies to the toad to find a note (2/2) and a swamp eye (1/2). Go to the city center and put the head on the statue to find a swamp eye (2/2). Go to the child’s bedroom and look at the music box.
Put the notes here to open it and find a candy button (3/4). Go back to the swamp and put the swamp eyes on the tree skeleton to get the moonlight crystal. Go to the well at the mill and give Helga the crystal and she’ll give you a lantern.
Go to the forest behind the tree face on the right path and find a way out. Use the lantern to find the secrets around you.
At the sign post take a right, forward, left, left, forward, forward to find the gate with the symbols you need to tap before you come back here to open the door.
Look around the maze for these and only light them up, no other symbol to find the mushroom forest.
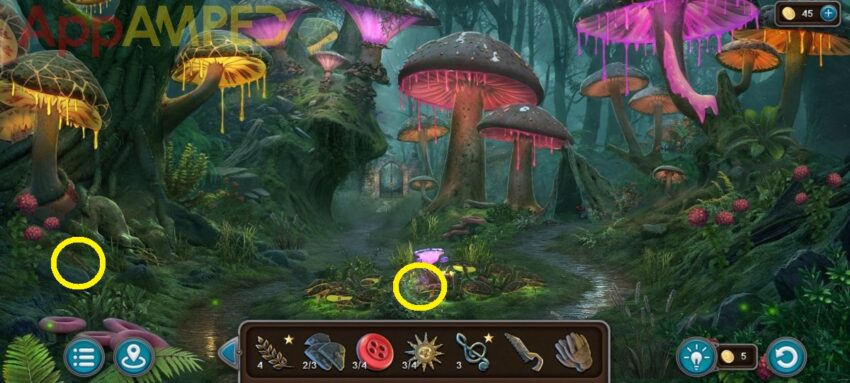
Note for collectibles: There’s a morphing object here that I’ve circled for you. There’s a swan* under a brick in the glowing mushroom circle on the ground.
Look in the tent to find a candy button (4/4) and a slab piece (1/3). Look at the mushroom roots on the left, use the saw to cut them and read the sign next to it. Go back to the apple tree and use the saw to get to the apples.
Collect all apple pairs until you find the one without and take it. Put the slab pieces on the stone sign here and take the glass flower (1/4). Go to the gingerbread house and put the candy buttons on the gingerbread man.
Remove all the chips from the board except one by moving them. Chips can only move by jumping over each other.
You’ll find a sun (4/4) and a glass flower (2/4). Now go to the city center at the chest on the left and put all the suns here. Enter the correct code. You have seen the hints earlier in the game.
At the tavern, on the table with the beers there are the same symbols and numbers next to it: moon – 7, sun – 3, star – 4. Take the mace (1/2) and go to the mushroom forest. Give the mushroom to the left the apple you found to be given a heart.
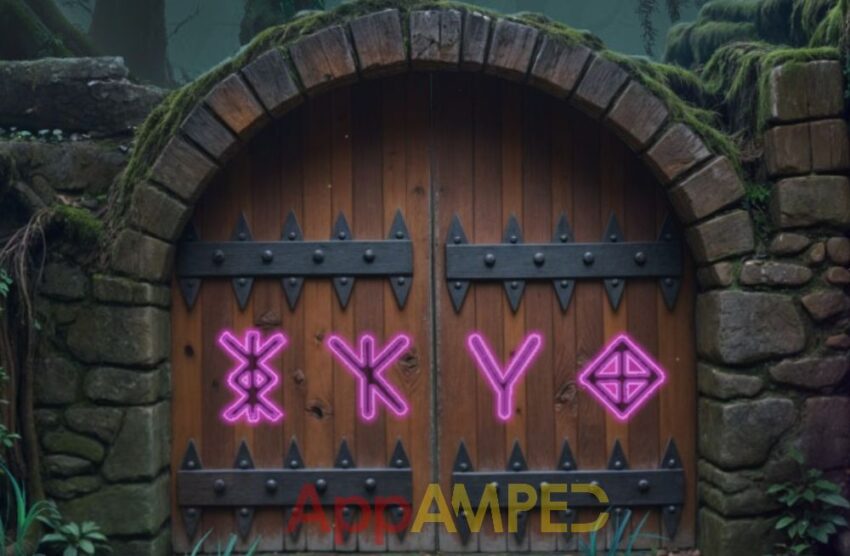
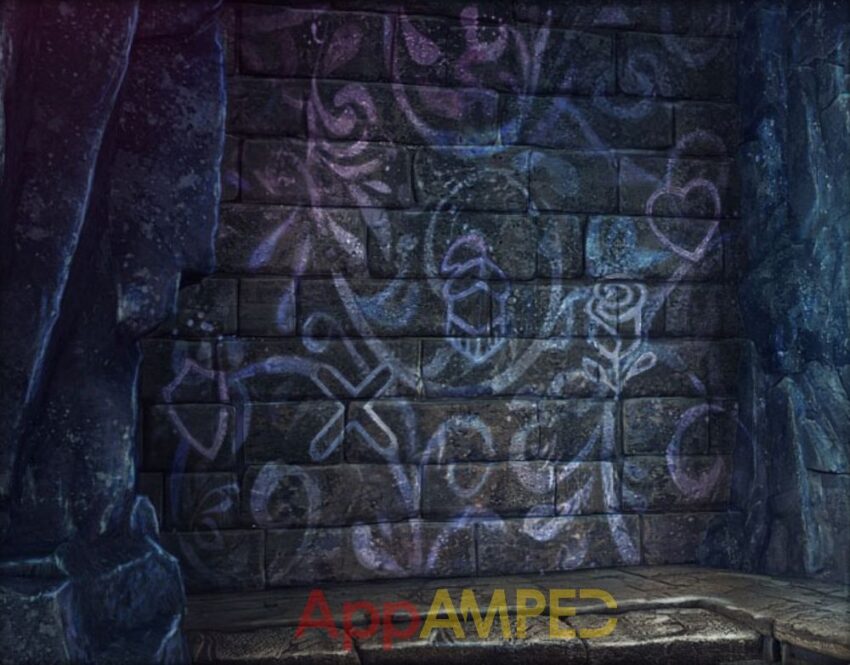
Go at the gate in the back and use the heart to open it. Arrange the symbols in the correct order. You have seen the hint in the game before. Inside the well there’s a wall with drawings on it, remember them to use on the gate.
This will take you to Rapunzel’s Tower. Explore the surroundings to find more stuff.
Note for collectibles: There’s a morphing object here that I’ve circled for you and a boot. There’s a treble clef* under a helmet in front of you on the ground.
Go to the pile of bodies under the tower and take the other mace (2/2). Put the 2 maces on the stone on the right under the sword to get it. Use it to cut the rope holding the mechanism up on the ladder.
Move the lever and get up on the bean to reach Rapunzel’s hair and go up into the tower to find her body.
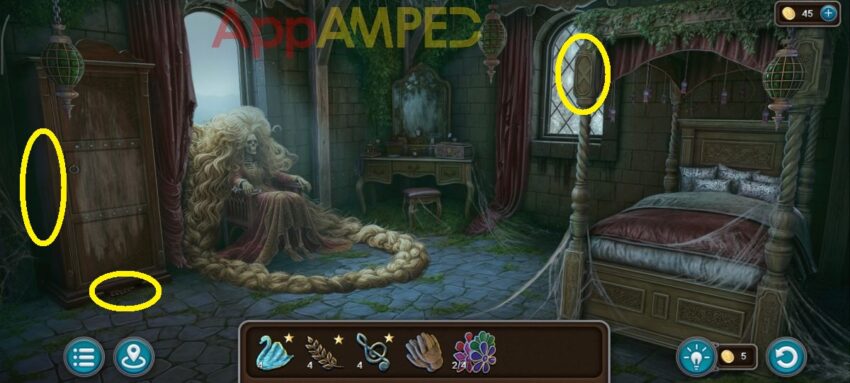
Note for collectibles: There’s a morphing object here that I’ve circled for you and a sword on the side of the closet. There’s a wheat* under the closet.
Look in the closet behind the clothes and take the snowflake (1/2) then read the note on the door, you’ll need it for some books later on. Take the key from her hand and go back down at the base.
Look at the basket hanging from the bridge, use the key to open the gate and take the guardian stone and the basket.
Go to the start of the dark forest where the face is sculpted in the tree, put the stone on the forehead and take the snowflake (2/2) from its mouth.
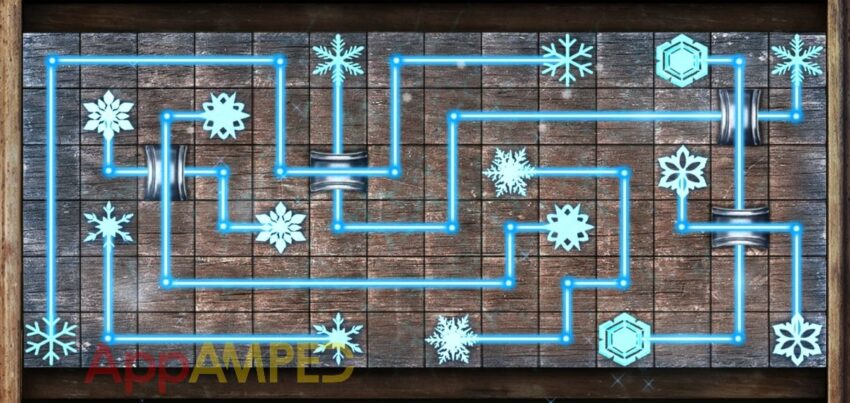
Go to Helga in the well and put the 2 snowflakes on the chest to the left. Connect matching snowflakes with lines so that they do not cross.
You’ll find a glass flower (3/4) inside. Now go look at the books on the bookshelf and use the clues in Rapunzel’s closet to put them in order:
- wolf – tree – gnome – wheel – frog
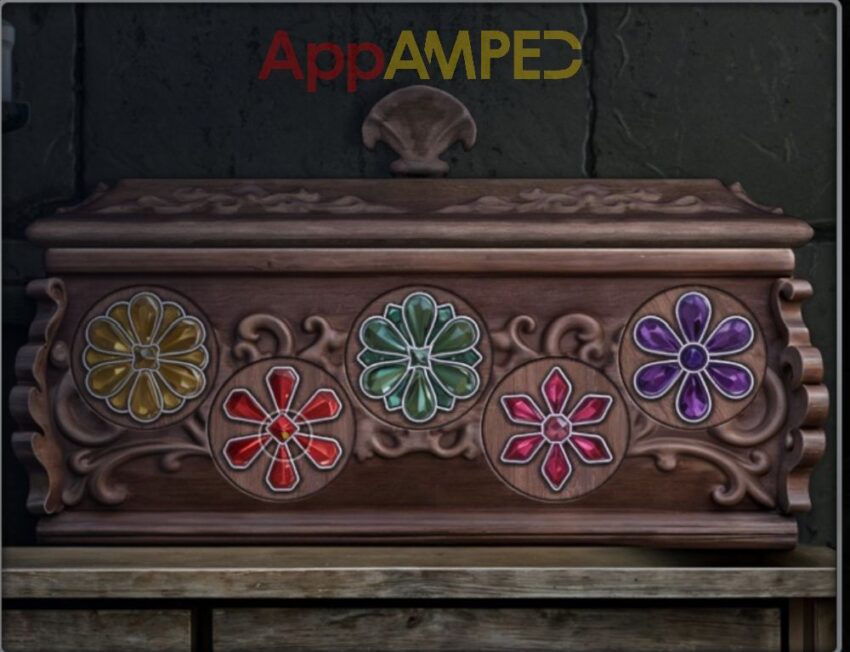
You’ll find the last glass flower (4/4). Go to Rapunzel’s room and put the flowers on the box in front of the mirror, then use the clue on the pillows to arrange the flower according to the hint you encountered earlier in the game.
Take the comb and go give it to the witch in the gingerbread house. She’ll give you a potion recipe. Go into her garden and look at the flowers, and take the ones in the recipe. Look at the tree with red bulbs on it and take a caramel resin.
Go to the mushroom forest and use the gloves to get some lightburn mushroom from the ground in front of you. Look at the pink dripping mushroom on the right, take a leaf and gather some mushroom slime.
Go inside the gingerbread house at the stove, put all the ingredients on the recipe and add them to the cauldron on the stove. Use the ladle to fill the pitcher and go take it to Red in the city center to finish the story and get a star.
Witch Wood – Rapunzel’s Secret Room Walkthrough
To find the Secret door you need to look under Rapunzel’s tower, between the brick wall and the dead bodies. Move the weeds out of the way and look at the door. Find all lamps, flowers and flags around to get the code to get in: 423
Enter the room and walk through the tunnel to find Rapunzel’s secret room. Find all the items on the list to receive a star:
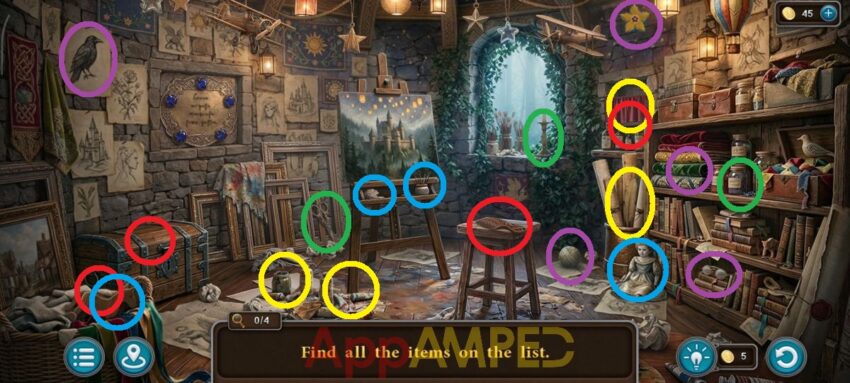
Yellow circles:
- Feather – in the basket with rolled canvas
- Key – on the floor with the paint tubes, in a jar
- Butterfly – on the floor, under a cloth, drawn on a paint tube
- Hourglass – on the shelf behind the little red drape, behind the herb jars, top shelf
Red Circles:
- Hairbrush – on the chair under the cloth
- Bell – next to the chest on the left
- Compass – inside the chest
- Button – on the bottom shelf where the hourglass was behind the jars
Blue circles:
- Doll – on the floor in front of the shelves
- Wooden horse – in the basket on the left
- Crescent moon – there’s a crumpled paper under the painting with a moon
- Needle – in the jar with brushes under the painting
Green circles:
- Scissors – next to the painting frames behind the painting on the ground
- Ring – 3rd shelf on the bookshelf, behind the big jars
- Flower – hanging lights, yellow flower replacing a star
- Candlestick – on the windowsill
Purple circles:
- Crow – drawn on a paper on the wall to the left
- Ball of thread – on the ground next to the basket with rolled canvases
- Glasses – in the bookshelf bottom shelf
- Paper boat – under the stack of fabric in the bookshelf
Morphing Objects Collectible Walkthrough
After find all 13 morphing objects you can receive a star if you go to the tavern at the morphing objects post with the wolf.
Swords Collectible Walkthrough
Go take the sword star at the apple tree, outside the city, at the puss in boots statue.
Boots Collectible Walkthrough
Go inside the well to Helga and check out the heart stand with fancy crystal shoes, and you’ll find your star.
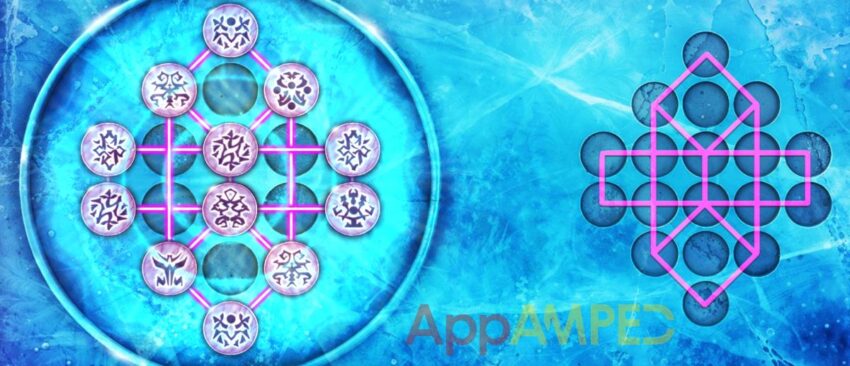
Swan Collectible Mini Game Walkthrough
Inside the well there’s a swan post to start your mini-games. Move the tiles around and recreate the pattern as shown in the hint on the right.
Pay attention to the symbols on the back of the tiles and arrange them like in the photo. Some symbols are in pairs so switch places between them if you don’t get it on the first try.
Swan Level 1 Mini Game Solution
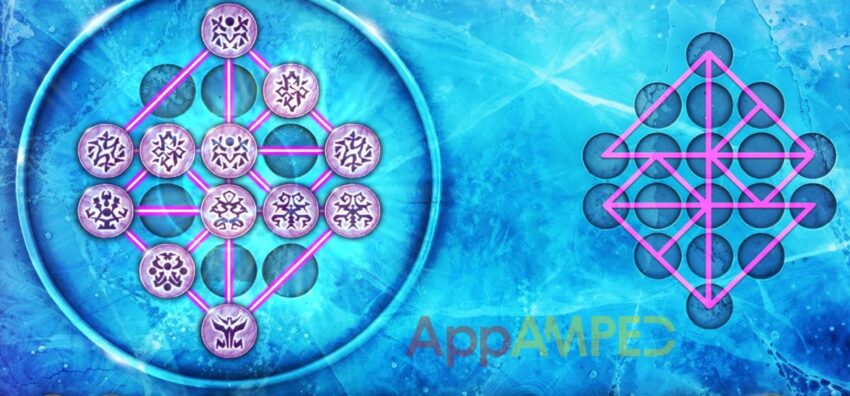
Swan Level 2 Mini Game Solution
Swan Level 3 Mini Game Solution
Swan Level 4 Mini Game Solution

Swan Level 5 Mini Game Solution
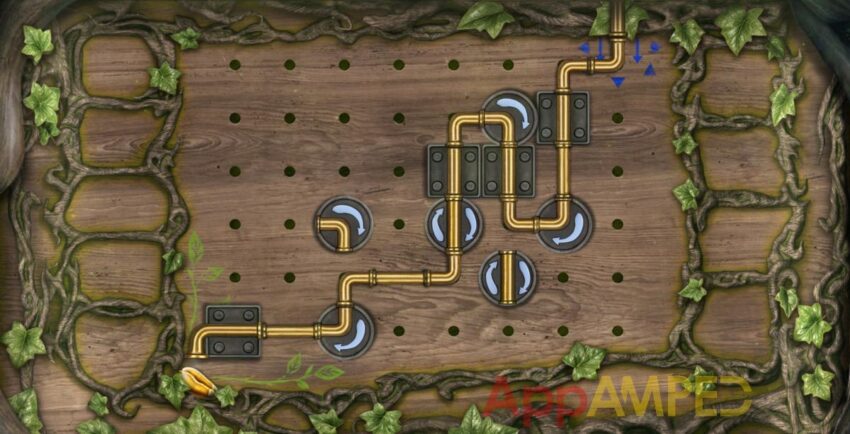
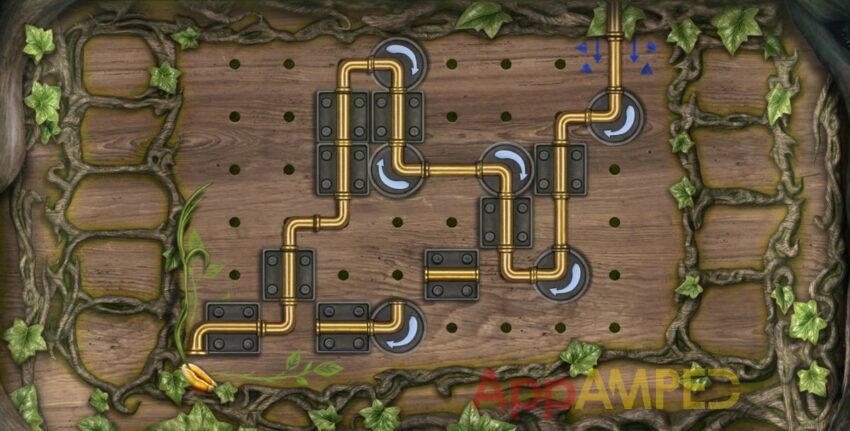
Wheat Collectible Mini Game Walkthrough
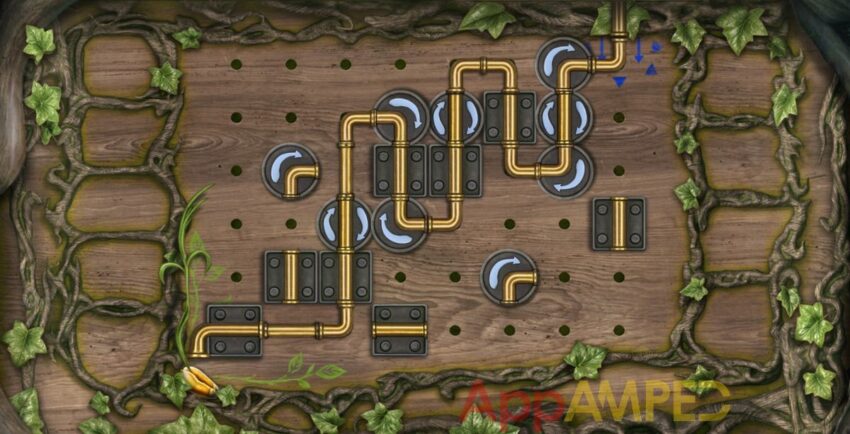
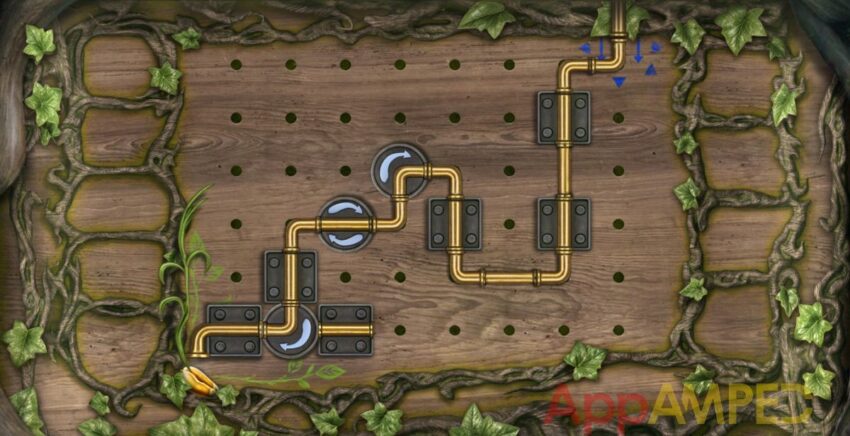
You’ll find the wheat mini games outside the mill where the scarecrow is. Water the seeds by assembling the pipeline. Use all the pipe fragments and only the necessary sections already fixed on the board. Solve all 5 levels to get your star.
Wheat Level 1 Mini Game Solution
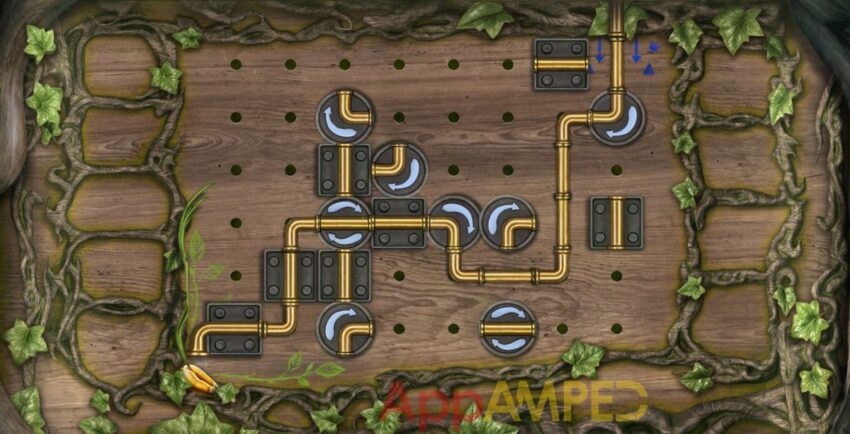
Wheat Level 2 Mini Game Solution
Wheat Level 3 Mini Game Solution
Wheat Level 4 Mini Game Solution
Wheat Level 5 Mini Game Solution
Treble Clef Collectible Mini Game Walkthrough
Go to the guardian tree to find the treble clef mini games on the right at the singing animal statue. Free the crystals by sliding the grates so that the crystals end up outside them and solve all 5 levels to get your star.
Treble Clef Level 1 Mini Game Solution
Treble Clef Level 2 Mini Game Solution
Treble Clef Level 3 Mini Game Solution
Treble Clef Level 4 Mini Game Solution
Treble Clef Level 5 Mini Game Solution
Wrapping up
And with that final potion delivered to Red, you’ve successfully navigated the dark Witch Wood fairy tale. By hunting down every hidden collectible you got all 10 stars.
Artifact Seekers has many other adventure planned so I’m sure we’re going to see each other soon on the next adventure. In the mean time you can try out other Artifact Seekers chapters like Artifact Seekers – Dragon’s Castle or Artifact Seekers – Haunted Theater.

Aylin is a content creator and co-founder of App Amped. She was a huge Tomb Raider fan before moving on to more casual titles. She spent way too much time tending for her FarmVille farm as well as playing text-based browser games. Now she plays and writes about mobile games, creating in-depth walkthroughs and useful guides.