
Welcome to a new adventure, where I’ll guide you through a story about the sea and monsters that will get in your way at every step.
Enter a world of secrets, dangers, and dark logic. Voice of the Sea hides more than just puzzles, it holds the key to a sinister story filled with adventures and mini-games.
Voice of the Sea Walkthrough
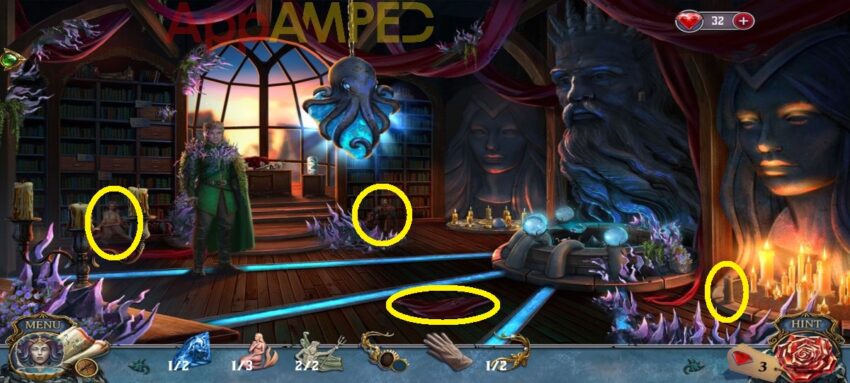
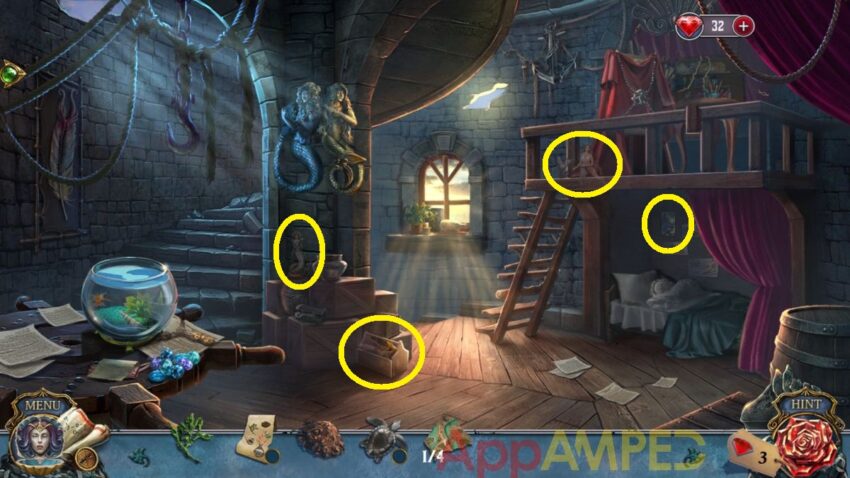
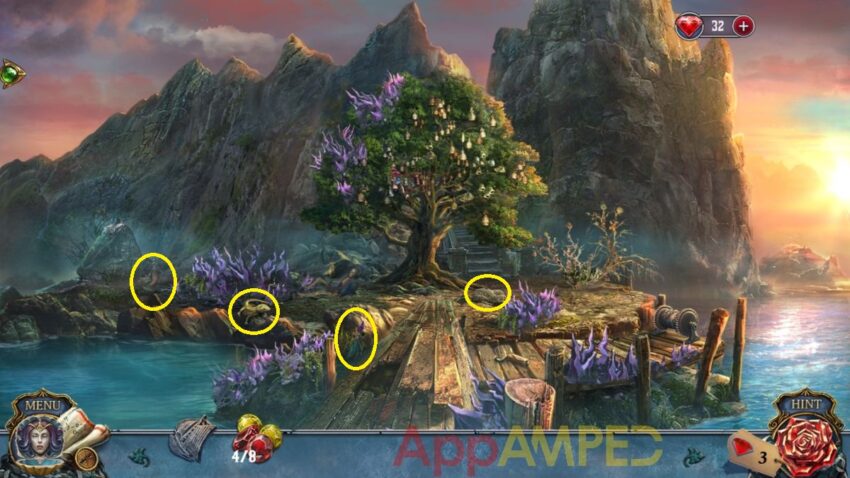
After you watch the story, you can open the envelope from Adam, read the letter and take the pearl. Talk to Rick and take the hammer from him.
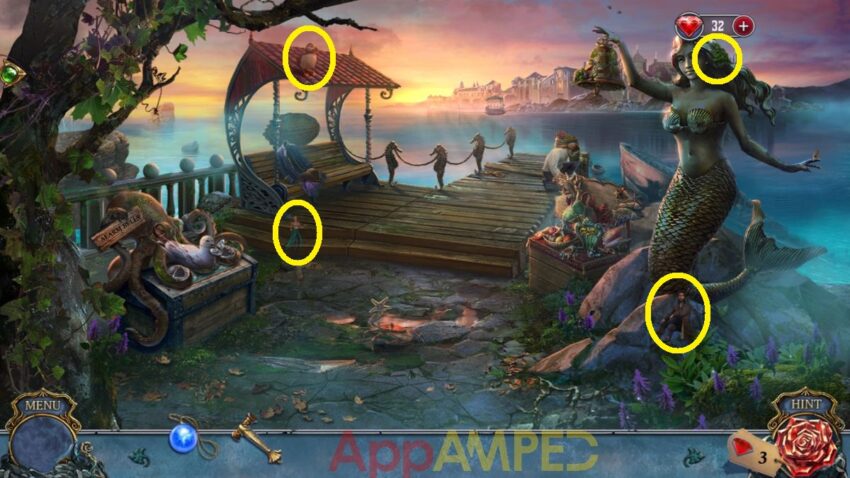
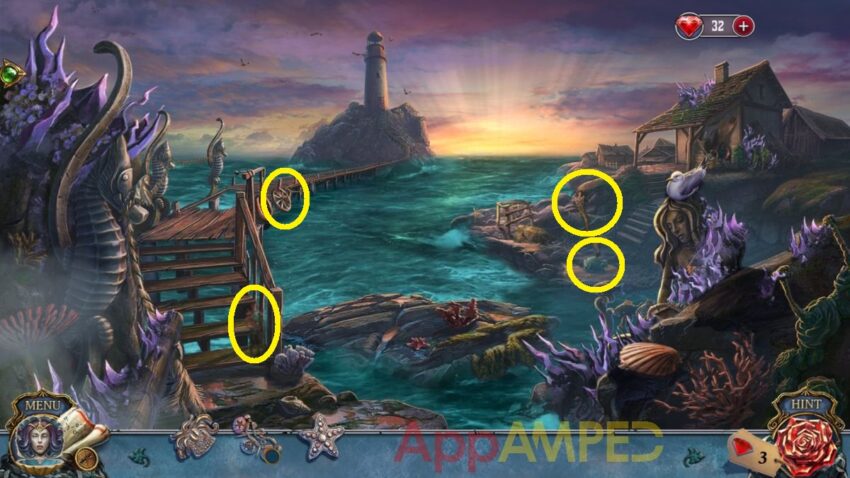
Note for collectibles: I circled all of the extra items and people you need to collect.
Use the hammer to ring the bell, but it will break, so go find another one, after you take it. Look at the souvenir table and take the barrette and the bag part.
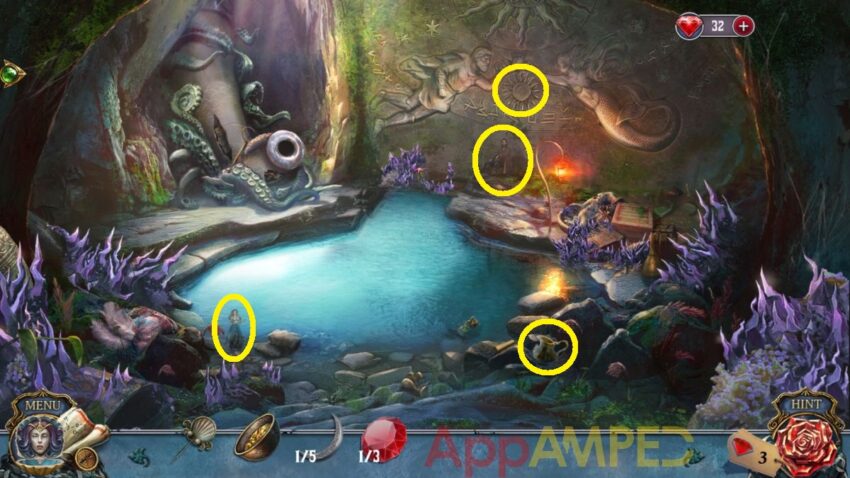
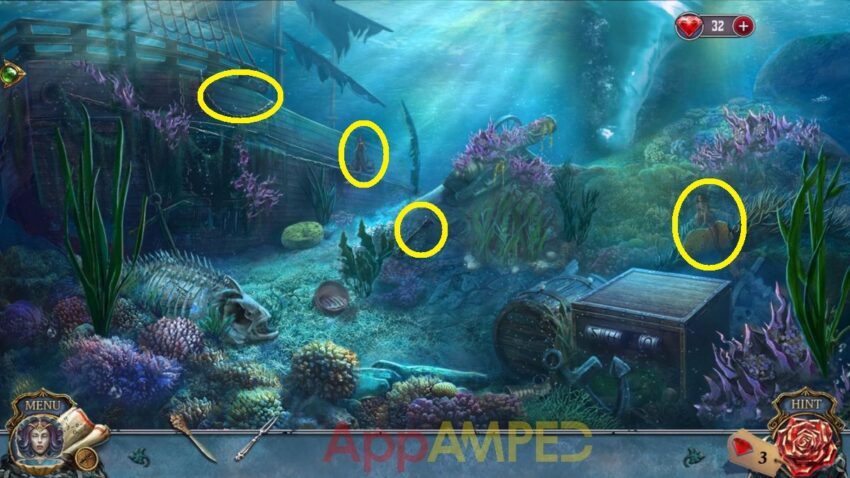
Look at the octopus on the left and try to catch the seagull. Go to the bench, move the clothes and read the notes, take the paper ball and the knife. Go to the edge of the pier where the seagull flew.
Look under the red coral to find the amulet part, use the knife to cut the rope of the bucket in the water and take it, then use the paper ball to throw at the seagull and get the chest emblem (1/3) from its beak as it falls.
Go back to the mermaid statue and use the bucket to put over the crab, move it carefully so you find the chest emblem (2/3) underneath, you can free the crab afterwards.
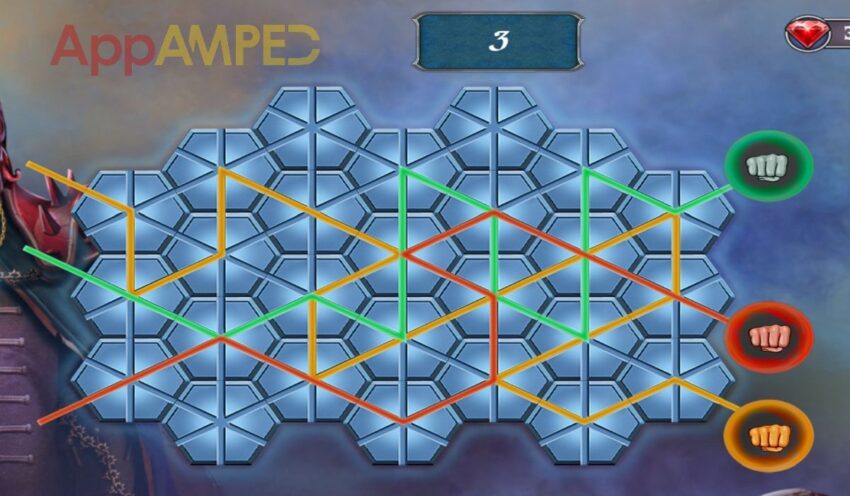
Take a closer look at the broken bell you took, it will crumble and you’ll find the chest emblem (3/3). Now use all 3 emblems to open the octopus chest on the left and solve the puzzle.
Complete the image. First, move the discs into the correct slots. Select two discs to swap them.Correctly placed discs highlight in blue. Then select and drag discs to rotate them into their correct position.
Take the bell from the chest and put it in the statue’s hand, then use the hammer to ring it so the ferry pull to the pier. Take Adam’s bag then find a way to disenchant Rick. Use the bag part to open Adam’s bag.
Read the letter and the note about the amulet, take it and put the amulet part on it to open it and hear what Morgana has to say. Give her the pearl and she’ll explain more about the situation then take the magic powder.
Go to Rick and throw some magic powder on him, then play the mini-game to defeat the magic shark after you got attacked by the mermaid. Take the pearl and give it to Morgana and she’ll give you a beast emblem.
Use it on the magic shark to remove the curse and he’ll give you an oil jar. Now you need to find hid spyglass.
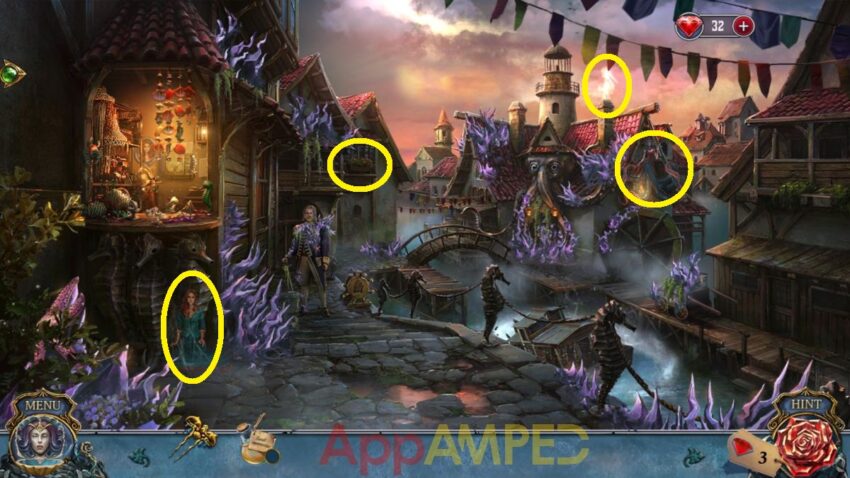
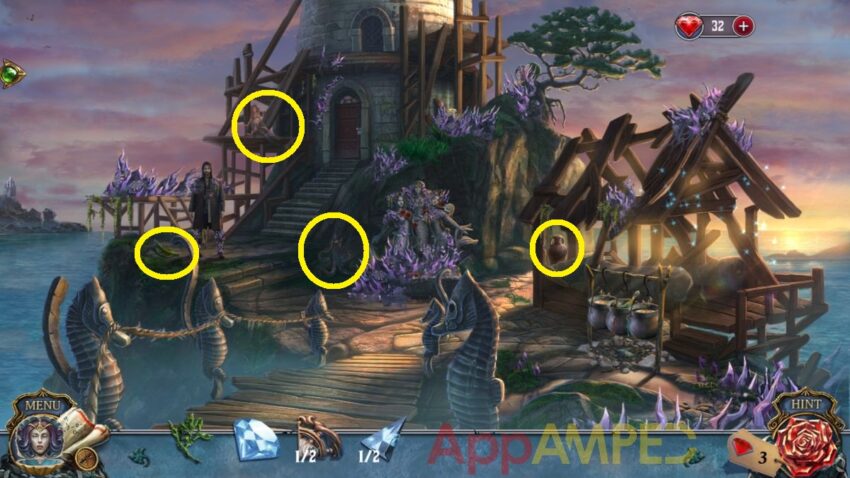
Note for collectibles: I circled all of the extra items and people you need to collect.
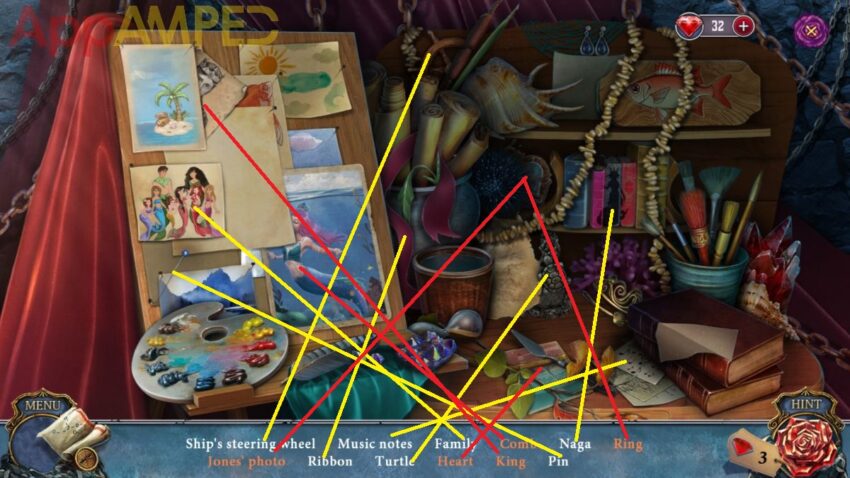
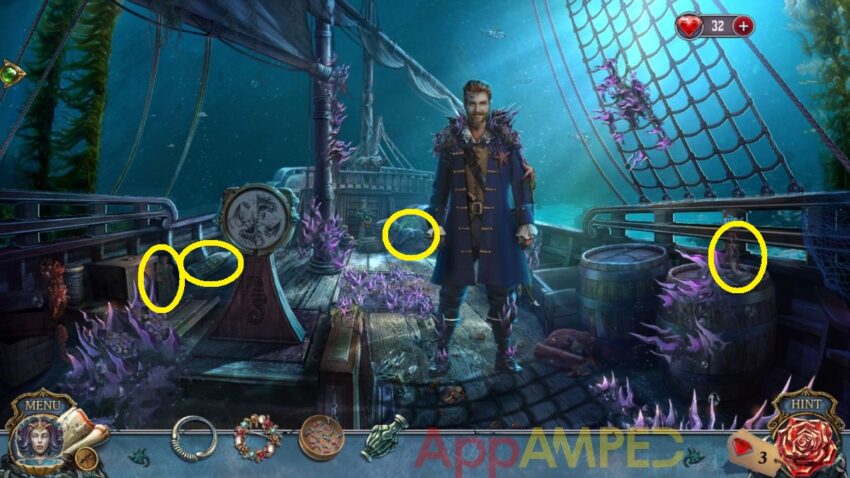
Look at the cart on the other side, and take the ship emblem and the image part (1/3). Go to the kiosk on the left, after the cat steals something, you can read the notes on the wall, and take the map, then take the rag.
Find all the parts of the mermaid statuette on the table, put them together and use the glue to fix it. Move it away to get the lens then look at the portrait on the wal, at the back, read the note and take the fish emblem (1/2).
Use the rag to clean the ship emblem then put the mixed items on the emblem back in their place to get the steering wheel emblem.
Look at the ship wheel in the back, use the rust oil to clean it, put the steering wheel emblem on it to move the boat and give it a closer look.
First you need to find the 3 animal emblems to reveal the words of the items you need. Then use the knife on the side to cut the rope.

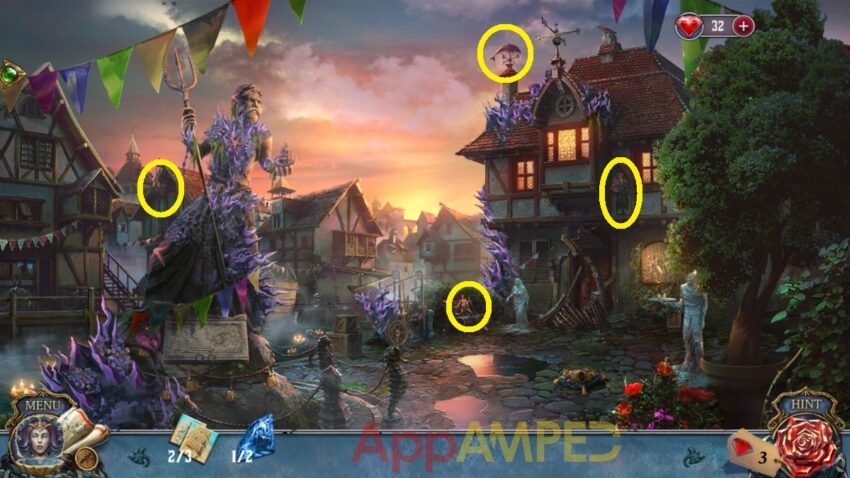
Ship: You need two wheels and 1 paddle to open the chest, and use the cane to take the ship out of the octopus’ hands.
King: There’s a pin to open the golden watch and find the king.
Mermaid: The portrait has 3 starfishes around her that need to be put back in place.
Neptune: Open the bottle with the corkscrew and take out the note to find the drawing.
Starfish: Under the mermaid there’s a note with a starfish on it.
Captain: Open the scroll to find the captain.
Kraken: Another scroll with the item you need on it, so open it.
Eel statue: On the edge of the boat.
Spyglass: at the bottom of the boat.
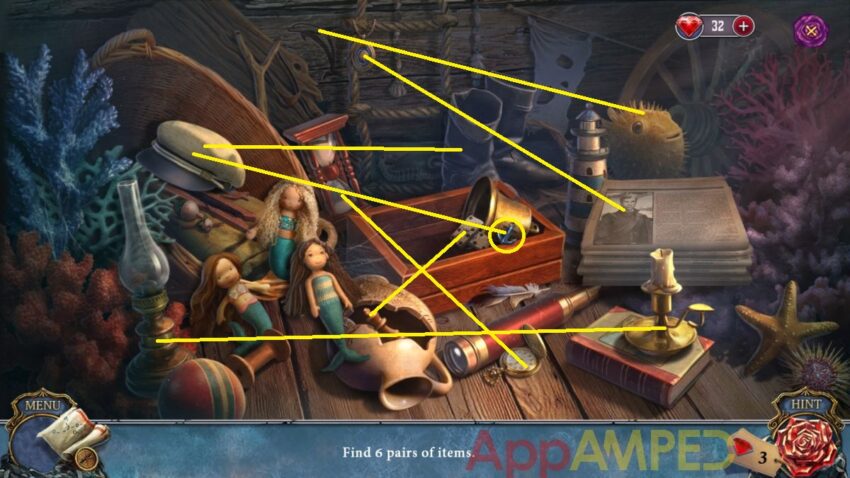
The last three items you’ll need to find at the end. The turtle is swimming under the boat, so catch it. The anchor is in front of the boat on the plate, and the bracelet needs to be fixed, it’s sitting broken next to the lighthouse. You’ll get the spyglass.
Take the shoe after the mermaid jumps out of the water and take the lace from it. Look at the spyglass, make it longer and clean it with the rag, then change the lens, use the lace to tie up the last part.
Give the spyglass to the man to lift the curse. Take the door emblem (1/2) from him and look at the journal on the ground, and take another image part (2/3). Go to the door of the city hall and you’ll find a last fish emblem (2/2).
Put the 2 fishes on the cart on the other side then solve the puzzle. To open the cart, place the fish tokens in the circles behind them. Select a fish to move it. Moving one fish may move others.
Sort the animals inside and take a fish, then go give it to the cat so you can take the door emblem (2/2). Go put them on the door of the city.
Move the tokens into their correct slots within the indicated number of moves. Select a token and move it along the lines to an adjacent empty slot. Then enter and explore the city center.
Note for collectibles: I circled all of the extra items and people you need to collect.
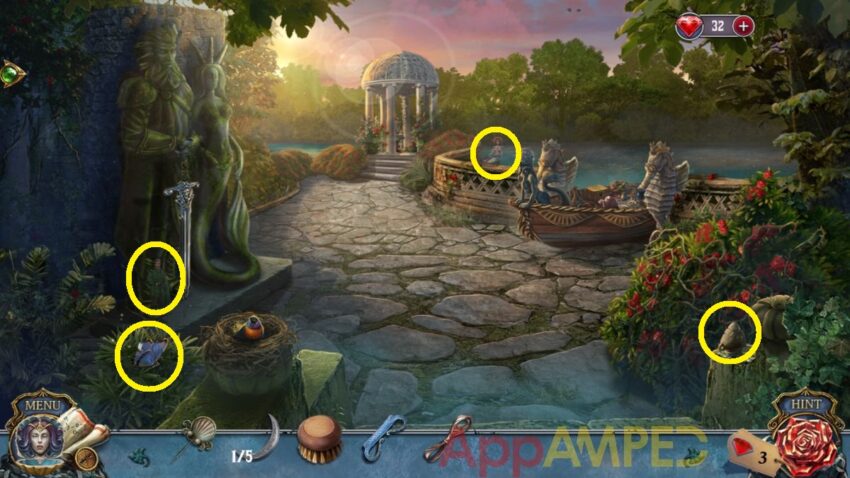
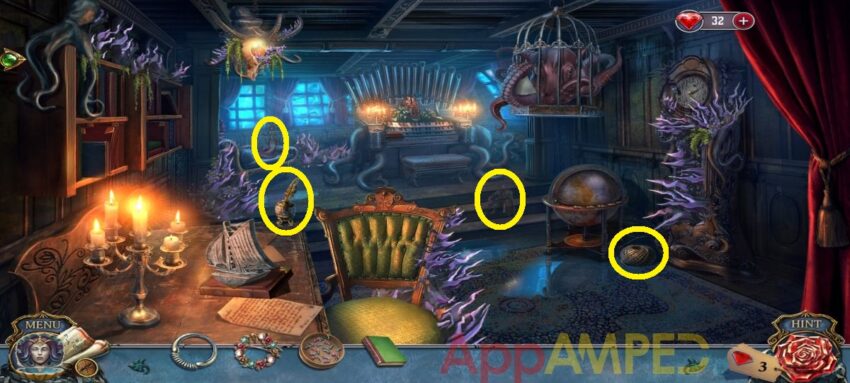
Take the mermaid statue (1/3) from the statue’s hand, then look at the bottom of the statue and take the royal stamp. Wipe the plaque with the brush and then go to the cursed thing next to the bench, you’ll find a bas-relief part (1/2).
Now go to the door of the house, remove the junk and put the triangles back in place. Take the last image part (3/3). Add the royal stamp to get the mail inside and read the letters. Take the bas-relief part (2/2) from the last envelope.
There are a few junks on the ground, you’ll find a Neptune’s wreath, a scroll, a glove, and a pin. Check out the window next to the door and take the wreath part (1/2), then use the pin to open the doors.
Use the image parts here. Arrange the tiles to complete the puzzle. Select one tile and a second highlighted tile to swap. Now you can go inside and defeat the Magic crab.
Place all the tiles so that the symbols on the sides of adjacent tiles match. Gold tiles can’t be moved or rotate. Select a tile to rotate it using the arrows, or select two tiles to swap them.

Take the magic pearl and use it to disenchant him. You’ll get a beast emblem that you can use on the Magic Crab to save the king, then go find his ring.
Note for collectibles: I circled all of the extra items and people you need to collect.
Look at the big stone man head, take the candle, then go to the candle circles under the first women head, put the candle here and take the sphere. Go to the spheres under the man head, take the magnifying glass and put the sphere here.
Go to the window, take the candle snuffer and the mermaid statue (2/3). Use the magnifying glass to find all 4 symbols. It will give you an order in which to push to open the table and get the code (1/2).
Go outside to the plaque under the statue and put the bas-relief pieces and find 6 mermaids on the picture, to find a wreath part (2/2). Use both to fix the wreath.
Go back inside, use the candle snuffer to put out the candles with the drop symbol. You’ll find another piece of the code (2/2) and a mermaid statue (3/3). Put the statues here and you’ll open the library hidden object game to find a magic book at the end.
Open the book by putting the emblems in their place then put the code pieces here, you’ll be given a code you need at the spheres. Remake each symbol from the lines you are given, in the exact same position.
You’ll find another Neptune’s eye (2/2) which you can use for the statue. Use the glove to look through the broken glass and take the ring, then give it to the king to break the curse.
Take the key from him and use it on the shelf on the left, you’ll find an ivory plate (1/2) and a king’s pass (1/2). Go outside and put the wreath on the statue’s head and take the king’s pass (2/2) from its hand.
Look at the bridge next to the bench use the king’s pass pieces to activate it and pass through to find the tavern. You’ll get in a secret passage under the bridge.
Note for collectibles: I circled all of the extra items and people you need to collect.
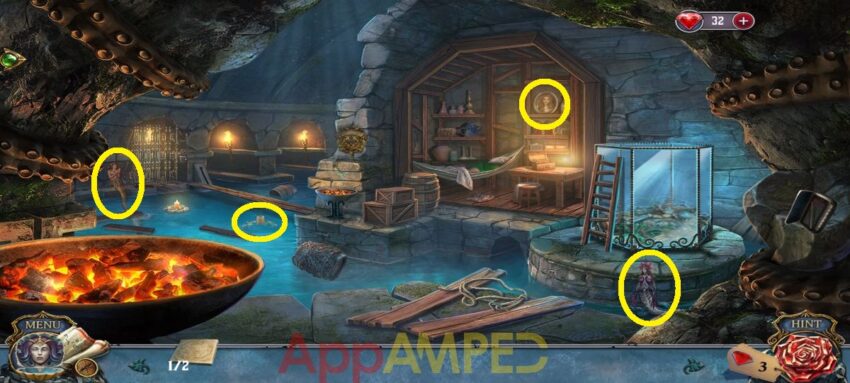
Take the rope on the ground and use it to reach the barrel in the water and pull it to the shore. Find the knots displayed on the top left corner to find a hairpin.
Put the two wooden boards to reach the other side and check out the big aquarium next to the ladder. Take the termites jar and check out the boat in the bottle then find all the shapes needed to find the key and open the bottle.
Take the scrolled map (1/2), then go to the barrel and use the termites to make a hole and get to the cup emblem (1/2) and locked bottle. Now go to the makeshift bed and take the cup (2/2), read the notes, and take the octopus emblem.
Remove all the bedding and use the hairpin to open the hatch under the bed. Take the handle and the bottle code. Look at it and use it to open the locked bottle to find another scrolled map (2/2) inside.
At the left of the bed there’s a shield where you can put the octopus emblem. Use the glass and paper to catch the spider and take the necklace emblem, then take the thorn map and read the note.
Use the map parts on the thorn map, put it together and get a map to the tunnels. Go to the gates on the left, take the register part (1/2). And use the handle to open the gate and the map to go through the tunnels.
- forward – left – forward – forward (use lock pick)
- forward – right (wooden board)
- right – forward – right – right – down (hammer)
- up – right – right – up – left (430 code – use the tiles) – key
You’ll find Adam and you can talk to him and take the button (1/3) from him and barricade the door.
Note for collectibles: I circled all of the extra items and people you need to collect.
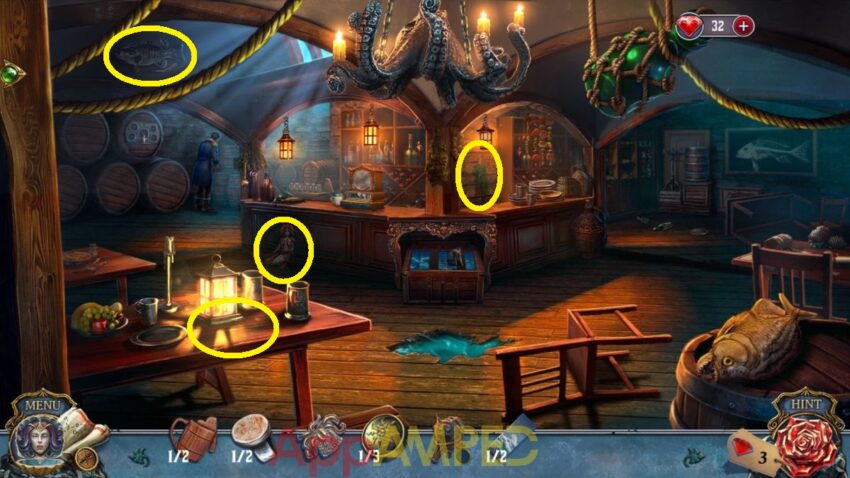
Look at the barrels on the left and take the cup emblem (2/2). Go to the barricaded door and take the picture part (1/2) under the shelves. Put the two cups on the wooden frame under the fish and read the paper then take the button (2/3).
Look at the counter and take the milk. Check out the cat, remove the rope and give her the milk. Now check out the chest under the counter right in front, remove the cloth and use the cat to scare off the mouse there, so you can take the last register part (2/2).
Check out the counter where the registry is and put the register parts here. Read the note inside, take the necklace and the picture part (2/2). Use the pictures where the mouse was sitting and remake the image there.
Read the Logbook and take the button (3/3). Go to the barrels again and use the buttons on the game. Rotate the shapes seen in the quadrants of every disc until they fit into the disc’s central figure, a boat. Now you need to find the mermaid’s voice.
Note for collectibles: I circled all of the extra items and people you need to collect.
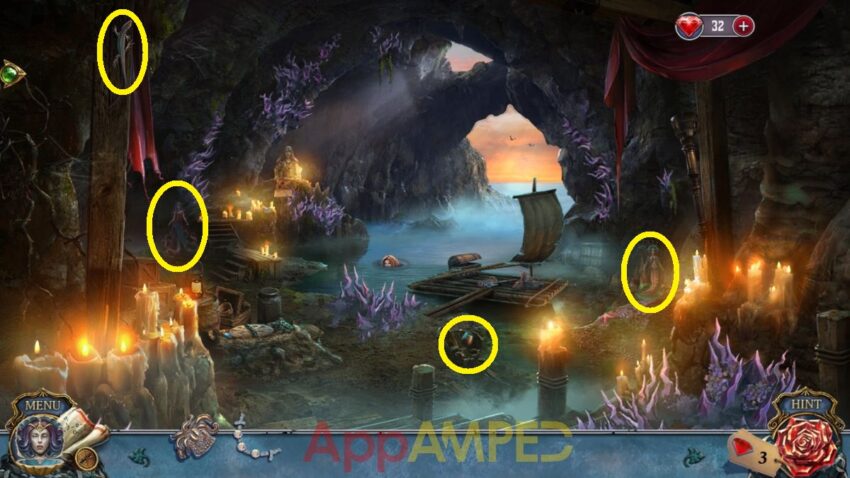
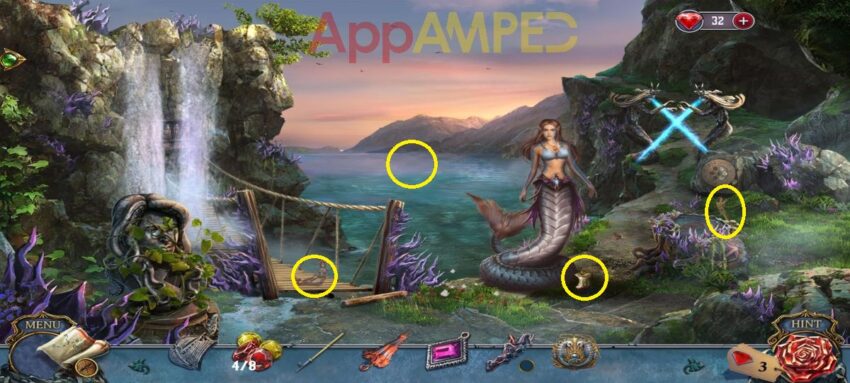
Look on the raft, take the necklace and the shovel. Use the shovel to dig out the chest, then go closer to it. Take the pendant and go to the mermaid statue. Remove the weeds and put the necklace part and the pendant on her neck.
Take the starfish and the key, then use the key on the chest. Solve the hidden object game to open the chest. Think of what the combination of the 2 shadows will result and find that on the chest and you’ll find Ayrine’s voice to give to the mermaid.
After the cavern is closed, take the belt from the ground, go to the fallen rocks and take the flag there. Untie the cloth from around the stick. Go to the wooden sticks in the water, take the sharp stone and put it on top of the stick then tie it with the belt.
Check out the sticks in the water, put the cloth next, then arrange the sticks to form a raft and tie it with the cloth. Use the spear you made to remove the fallen rocks and use the raft to escape the cave and find your way to the lighthouse.
Note for collectibles: I circled all of the extra items and people you need to collect.
Look at the necklace in your inventory, put the first emblem in its place to get a note and half of a crab, put that in the middle. Do the same for the starfish to get another half and get it in its place, to find a medal.
Open the oyster in front of the statue to make the seagull fly away. Go to the wooden trap on the shore, untie the rope to get the board (1/3). Go to the seagull on the bridge and take the rag next to it.
Check out the broken boat that the waves brought to shore. Take the hook from under the crab and the board (2/3) here. Smash the bottle with the rock and read the note.
Use the rag to grab a sharp glass to make a knife. Use it on the net at the wooden trap to get some algae from under it. Check out the little cabin, read the newspaper, take the fish line and the rod. Take the oil and use the medal to unscrew the boards (3/3).
Put the fish line on the rod, then add the hook and go to the trap to throw it in the water and catch a fish. Give the fish to the seagull on the bridge to give you the diamond.
Use the boards to fix the bridge to reach the other side. Fight with the cursed man and win the mini game.
Use the magic pearl on the shell to get a beast emblem to use on the man and heal him from the curse. Take the tube from him, use the oil on the rust and take the octopus tentacle (1/2) and prism fragment (1/2).
Note for collectibles: I circled all of the extra items and people you need to collect.
Look at the cursed statues in front, read the notes about the recipe and take it. Go to the 3 cauldrons, read the card under them, and take the handle under it, then to the tree, take the dirt and use the handle on the shovel to take it.
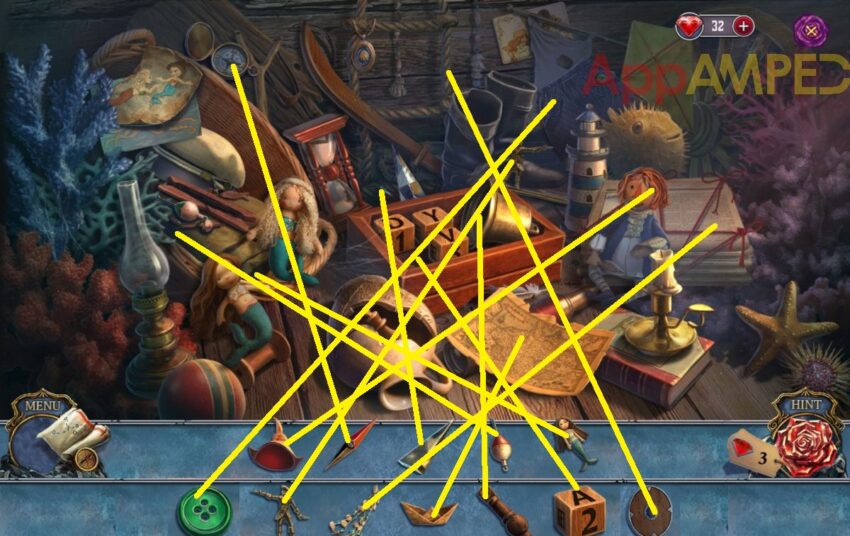
Check out the shed and look for all the hidden objects:
You’ll find a prism fragment (2/2). Go back to the coral reef and put the prism in the hands of the mermaid statue. Unite the 3 beams of light coming from the sea horses, and start digging with the shovel in that spot.
Take the chest and go back to the lighthouse entrance. Use the diamond in the eye of the first seahorse and take the octopus tentacle (2/2). Put the 2 tentacles on the chest lock and rearrange the octopus to look right so it opens.
Look at the photo, read the back and take the chest then give the man his chest back. He’ll give you the lighthouse key, which you can use to open the door and go up to find Ayrine and get the dictionary.
Use it to to communicate with her. Combine symbols to create the pairs. You can turn pages. Then choose the right words to find the witch’s plan:
If Sea Witch Get Trident, Take over Power, Kraken Wake up, Destroy Island.
Take the turtle from Ayrine and the map piece from him the explore the rest of the lighthouse to get more clues.
Note for collectibles: I circled all of the extra items and people you need to collect.
Look on the table next to the fish and match each gem pair until you are left with one gemstone, then take the shears and mirror (1/2). Look at the window, read the book and take the candle stick.
Go to the bed, take the tweezers, put the red thread over the needle and sew the stitches making sure the lines do not cross. Take the needle and thread then go outside under the tree and take the screw.
Read the instructions for the gemstones and the ones for the glider. Put the gemstone on the stone machine by the water and shape it to fit the turtle. Check out the grass in front of the lighthouse and remove the weed to find the herbs.
Now use the turtle with the gem on the lock when going up the stairs inside the lighthouse. Find all the objects listed here.
You’ll get a mermaid bracelet. Look at the window and use the screw to take the cork out and get the mermaid jewelry (1/3), move the bottle to get the coffee grounds. Go outside and check under the shed again for 6 pairs of items.
You’ll get a old hang glider, and you can use the needle and thread to fix it. You can use the peat + algae + herbs + coffee on the recipe, then go outside to the cauldrons, put the ingredients in to make a fertilizer.
Go inside and use the candlestick to get into the fishbowl and get a mermaid jewelry (2/3). Go to the window and use the fertilizer on the flower in the pot then take that flower.
Use the flower and mirror on the mermaid statues to get another map piece (2/4). Go outside to the other mermaid statues and use the tweezers to remove the spikes and find the cache handle.
Go to the coral reef, use the cache handle next to the other mermaid statue to find another diadem jewelry (3/3). Put the bracelet on the statue to find another map piece (3/4).
Go to the 3 mermaid statues, put the mermaid jewelry on them to find an incomplete map. Go inside and check out the top of the ladder again and find the obects hinted in the pairs:
- shell + diamond – pearl (inside the box you open with a key)
- sun + clock arms – hourglass under the gems
- compass + mountain – map
- death + wave – octopus
- crown + shell – drawing on the book
- throne + fork – trident
- lamp + waves – lighthouse (finish the drawing with a pencil)
- lady + fish – mermaid (in the drawing)
- cloud + waves – seagull on the drawings
- lady + octopus – octopus monster on the pot holding the scrolls
- chest + mermaid – jewelry between the box and the bowl
- Flag + boat – ship craved on the wooden board
You’ll get the last map piece (4/4), so put all 4 on the map and put it together, then give them the map to get the route of the map and the rope. Use the rope to fix the glider. Go outside to the tree, put the glider down and the map to reach the Royal Park.
Use the sheers to cut the branches and see better, then the map to see if you’re in the right place. Find all the differences before you explore the place.
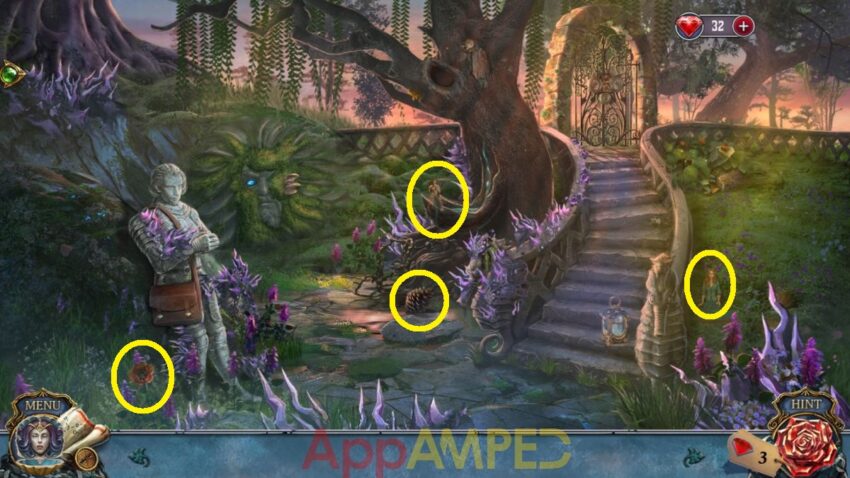
Note for collectibles: I circled all of the extra items and people you need to collect.
Take the lantern from the stairs, open it and take the cake spatula from inside. Look inside the bag of the statue here and take the crystal stand and the cup.
Go to the head in the stone, use the spatula to clean it and take the mushroom, then remove the pieces from his broken eye. Look at the tree, where the hole is and take the shell pin and use the cup to gather some resin.
Check out the gate and take the moon emblem (1/5). At the top of the stairs on the right side there’s a hedgehog. Give it the mushrooms, read the note that you find after he leaves, take the gem (1/3), and find all 9 hazelnuts.
Give the hazelnuts to the squirrel in the tree to get Neptune’s eye. Put it back into its place on Neptune’s head and check out the cave behind. Read the note on the floor and take a scoop of lava.
Put the lava scoop inside the lantern, go to the hole in the tree and find all the hidden objects hinted at the bottom. Note: The girl’s portrait is hidden behind the spider web, you need to clean it with the brush.
You’ll find a crystal, and you can go back to the cave with it. Put the crystal stand in the hole where the note was, put the crystal on it then combine the symbols to remake the one on the diadem. Now you can pass through the tunnel.
Note for collectibles: I circled all of the extra items and people you need to collect.
To the left, on the edge of the pond, you’ll find a veil and feathers. In the water right in front, there’s a note and to the right , a brush, and in the crate a ball of thread, a gem and a stick.
Look on the other side to the octopus tentacles, take the net frame. Use the veil and thread to weave the net. Use the net to fish the boot from the water, clean it and take the flint and the shoelace.
Put the feathers on the stick, then use the shoelace to tie them on. Go to the octopus and use the duster to clean it to find a spool of wire. Use the resin to mend the broken sculpture and talk to the nagas and win the game.
Give the pearl to receive a beast emblem and use it on them to heal them. Take the last gem (3/3) and go find them their harp. Go outside and to the gate and use the 3 gems. Make a continued line for each gem to open the gate.
Note for collectibles: I circled all of the extra items and people you need to collect.
Look at the sword in the statue’s hands, take the moon (2/5), use the brush to clean the sword and take it. Go to the roses on the right, use the sword to cut the thorns to find a box.
Go to two seahorses and take the teapot, look inside the fortune cookie and read the note and on the back there’s a code 1578. Take the crumbs and the oil. Use the pin to open the box, look through the letters and take the letter opener and Orpheus.
Go to the box in the bushes and use the code to open it, inside you’ll find another moon (3/5) and a key. Check out the bird on the left, use the crumbs to make her fly away and take the hay.
Go to the pavilion in the back, put the hay in the teapot, use the flint to light it and make a smoker, then use that on the bees to shoo them away. Use the oil on the chest to open it, read the letters and take the plate.
Put Orpheus on the glass holder of the harp, use the plate on the lock then restore the picture:
Use the wire to fix the harp and take it. Go inside the catacombs and give them the harp, the spell will be broken and they’ll give you a bracelet.
Go outside and use the pin to take the case emblem from the shield. Look at the left seahorse and take the moon (4/5). Look inside the tree again for more hidden objects.
You’ll find a spider repellent, you can use it inside on the junk to your right, then use the key to open the suitcase, read the newspaper, take the fork, put the case emblem here to find the last moon (5/5).
Use the 5 moons on the grate where the water is flowing through, then use the bracelet to go underwater and find a way to the Flying Dutchman.
Note for collectibles: I circled all of the extra items and people you need to collect.
Check out the chest on the right, take the net gun, read the paper, take the sharp shell and the jar. Use the fork to pull out the nails on the barrel and take the ring. Go to the shell on the ground and use the sharp shell to open it, take the brooch and sieve.
Look at the fish skeleton on the left, take the broken arrow and remake the boat drawn on the bones. Use the jar to gather 3 jellyfish. Use the sieve to get the plankton fishes.
Under the canon there’s a hole behind some weeds, use the lamp to see around, then pair up all the fishes. You’ll find a wheel, a net, and a sea sponge.
Go to the green rock under the electric fish and use the sponge to clean it and find a code. Go to the chest, put the wheel in, look at the code and open the chest with it.
Remove the rope to get the hooks. Use the broken arrow to clean the net gun. Add the net and the hooks with it. Use the gun on the electric fish. Fill the cells to catch the fish, the use the letter opener to free yourself. Defeat the monster pirate in the mini game.
Give the pearl to the mermaid to be given a beast emblem, then use it on the monster. Take the acid from Adam and explore the surroundings.
Note for collectibles: I circled all of the extra items and people you need to collect.
Check out the bag on the ground, open it and take the book. Go to the lock in the back and use the acid to melt the chain then enter it.
Note for collectibles: I circled all of the extra items and people you need to collect.
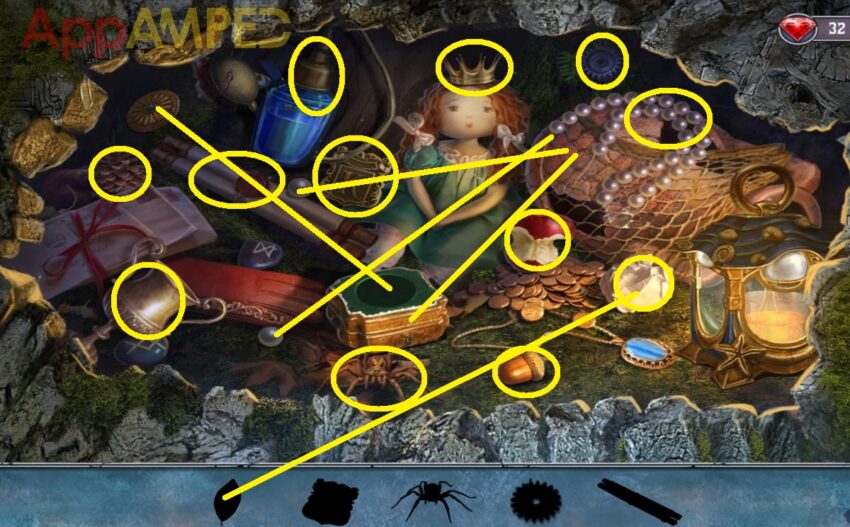
Look at the desk and take the paperweight and diary. Open it and put the pieces back together. Take the flower and look through, then find the highlighted words in the pictures. You’ll find a puzzle piece at the ends.
Look at the bookshelf above the desk, put the book here and find a place for all the books so you can open the middle then find all the hidden objects.

You’ll find a pocket watch. Open it and insert the puzzle piece to reconstruct the image and remember the time it’s showing on the clock: 10:10. Go to the octopus in the cage, read the note, give it the plankton and take the barometer piece.
Go to the organ and get the piece of paper, then use it on the pocket watch to write in the time. Look at the clock on the wall, take the organ key (1/3), put the clock number in and use the paper with the time to find a globe code.
Go to the Globe and put the code in then press the buttons in this order: 3 – 1 – 5 – 2 – 4. It will open and inside you’ll find a note, a handkerchief, and an amulet.
Go outside and give Adam the amulet, he’ll give you a bag. Use the brooch to open it and take the organ key (2/3) and you’ll learn about the potion. Look at the grate on the floor and take the harpoon.
Use the hatch ring to open it and take the wheel from inside. Use the barometer on the location device on the deck and rearrange the pieces to complete the image and you’ll find the last organ key (3/3).
Look at the net on the right, use the handkerchief to clean the compass, take the 2 yellow crystals (2/8) and the chain. Go outside at the canon and take 2 red crystals (4/8).
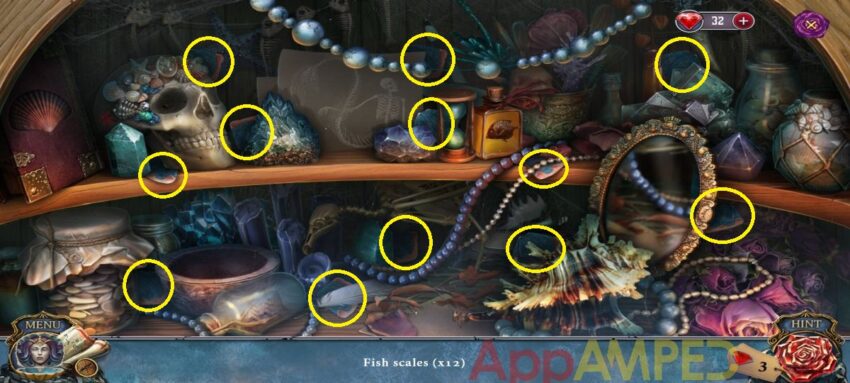
Go back inside the cabin and look at the bookshelf on the left, then find all 12 fish scales.
You’ll find wonderfish scales. Go to the organ and put the organ keys on to find kraken poison. Use the harpoon to open up the seashell lamp from the ceiling and get the weight. Go to the clock, put the chain on and the weight to find a crab tweezers.
Go outside and use the tweezers to open the bag and get the sea dragon tears. Open the magic potion bag, put the 3 bottles here, then use them to mix the colors according to the note to get the exact poison for the bomb.
You’ll need green, purple and orange, then mix them all in the big bottle to get the magic potion. Go out of the boat to the cannon. Use the wheel to fix it and give it 2 wheels, then use the magic potion to throw into the whirl and go to the shore.
Note for collectibles: I circled all of the extra items and people you need to collect.
Take the handle from the ground, then look at the device on the right, take the spear and use the handle to pull up the net. Take the umbrella and clean the chest.
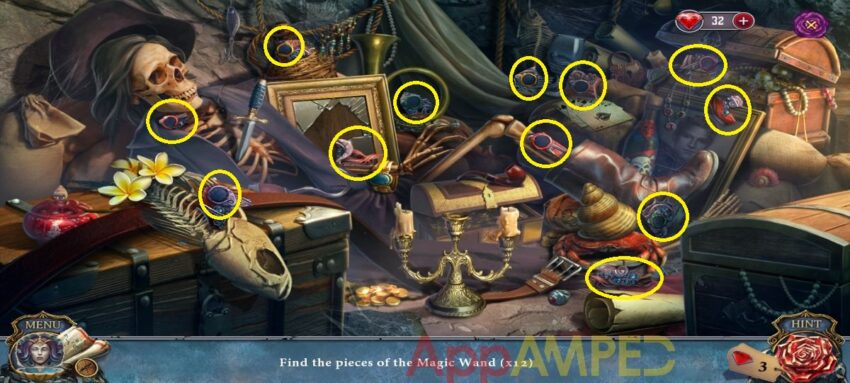
Look in the tree at the bells and take the medallion, then tap the skeleton under the tree and check out the objects there to find all 12 pieces of the magic wand.
You’ll get mermaid’s wand and go up the stairs, behind the tree. Defeat the monster in the mini-game by moving the tiles matching the center number to reach 80. There’s no quick way of doing this game, as it’s very random. Just plan your next numbers ahead.
You’ll get a pearl, to give to your helper and take the beast emblem and the power of the sea. Use the emblem on the monster to heal her. Take the wand fragment from her and explore the waterfall.
Note for collectibles: I circled all of the extra items and people you need to collect.
Take the axe handle from the ground, then look at the statue head on the left, put the medallion here to find a note and 2 more crystals (6/8). Use the paperweight to brake the side and take the emblem. Look next to the rays and you’ll find a wooden token.
Go back to the shore, use the emblem on the basket to open it and take the figurine and the last 2 crystals (8/8). Go to the waterfall, use the umbrella to look under the falling water, put the figurine here and arrange them in the right order:
- Sea witch – sea creature
- Ayrine – seashell
- Prince – K mark
- Adam – treasure chest
You’ll find a stone rune (1/3). Now put the wand back together with the crystals and last piece, arrange the crystals to match the back holes. Once you put them in order give the mermaid her wand, she’ll give you a tear of the sea.
Look at the tree stump, use the handle to get the axe and take the pot. Use the spear to remove the cap on the stump and find another rune (2/3). Go back to the shore and look at the fire skeleton junk to find all the hidden items.
Take the pearls and fill the pot with water from the left side of the bridge, then use the axe to cut some branches from the wilted bush on the right. Put the branches on the fire pit, blow into the fire, add the water to evaporate and get some salt.
Go to the anthill and put salt on them to get the last rune (3/3). Go to the waterfall, next to the rays, add the runes and sea tear, arrange the symbol to match the ones next to them. Move through to reach the Sea Witch at the top of the mountain and stop her.
Note for collectibles: I circled all of the extra items and people you need to collect.
Take the bell, then go to the tree trunk and put the wooden token to open it and take the music of the sea. There’s a note on the ground next to the tree about what you need for it.
Look at the roses and jump them over each other until one remains and you’ll get a magic lens.
Go back to the waterfall, use the lens on the green grass next to the bridge and find the 7 flowers by moving the lens over the grass. Go back to the shore and look at the tree and put the bell here, the tap the bells in this order: 4 – 2 – 1 – 3 – 5.
Get the bells and fix the music of the sea, by putting the pearls, then add the bells, then put the flowers and find their place. Add the power of the sea to it, then take the music to the Sea Witch to defeat her.
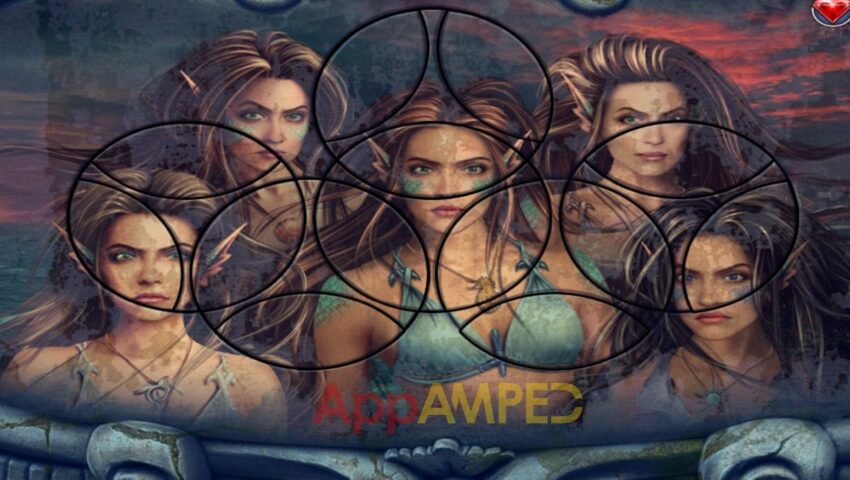
Arrange the symbols on the inner circle of tentacles to match the ones on the outer circle. Select the right and left arrows to move the slider, and the middle arrow to pick up or swap the two closest symbols.
Wrapping up
With the final puzzle solved and the curse finally lifted, your journey through Living Legends: Voice of the Sea is officially complete.
It wasn’t an easy path, especially with those intricate mini-games and hidden object scenes, but by following this guide, you’ve ensured a happy ending for the characters involved.
We hope this walkthrough made your adventure smoother and helped you whenever the sea’s mysteries got a bit too murky. If you’re looking for more adventures you can also try Artifact Seekers – Dragon’s Castle or Lost Lands 11: Chapter 1 – Anomalous Event.

Aylin is a content creator and co-founder of App Amped. She was a huge Tomb Raider fan before moving on to more casual titles. She spent way too much time tending for her FarmVille farm as well as playing text-based browser games. Now she plays and writes about mobile games, creating in-depth walkthroughs and useful guides.
Glad to see you’re still there. Love your amazing walkthrough like always. Thank you so very much for creating. Very appriciated.
<3 Thank you so much for reading! Always happy to help!